Okay, here is the next topic:
UTILIZING THE MIDI CONTROL SIGNALS
For this next portion, we're going to focus on the specific MIDI CC signals being sent to MidiNES via each MIDI Out channel (as well as a few controls that are included with most DAW's). Luckily, the same set of CC's are used for both Pulse channels so you'll only need to familiarize yourself with the CC's of four channel types. Additionally, the Triangle and Noise channels only have five CC's between the two of them and unless you're doing some really funky stuff, you'll only require the use of a few of the DPCM channel CC's. Personally, I only ever use one of the CC's associated with the DPCM channel but I'll cover the other more commonly used controls since they have some good uses. I could write up a chapter's worth on the pulse channels alone but since this is a comprehensive guide, I'll save some of the real nitty gritty stuff for later when we get into composition.
USING THE MIDI CC'S FOR THE PULSE CHANNELS
One of the most used controls for the pulse channels in my own compositions, and one that is not available on the Triangle or DPCM channel, is the volume envelope (CC#11). In fact, the Triangle and DPCM have no volume control whatsoever. This is arguably the primary reason that many classic NES soundtracks use the Triangle as a bass most of the time (that and it has great low-end). But don't worry, there are composition techniques we'll cover later on that will give you options.
Volume Control
Basically, when it comes to controlling the volume of notes played on the NES sound chip, you have three options:
1) Note Velocity - this value is not one of the custom CC's we set up, but rather a standard control included in every piano roll/sequencer. This volume setting applies to each individual note and if you've ever recorded a MIDI composition from a keyboard or other external MIDI controller, you probably know that the harder you press the notes (if your device is touch sensitive) the louder this 'note on' velocity will be and likewise, the softer you press the key, the quieter it will be. When adding notes directly into the piano roll, this value is usually assigned via 'note properties' or other similar window/panel. In FL Studio, double-clicking any individual note will bring up the options for that note and these options include the volume/velocity of that note. This is the only stock control within these that we would be setting within the piano roll itself as most of the others don't have any effect on the MIDI CC's being sent to the NES. The note fine pitch control knob does change the pitch of the note but as this only changes the pitch of the entire note and cannot change the pitch over the duration of the note, we won't be using it at all.
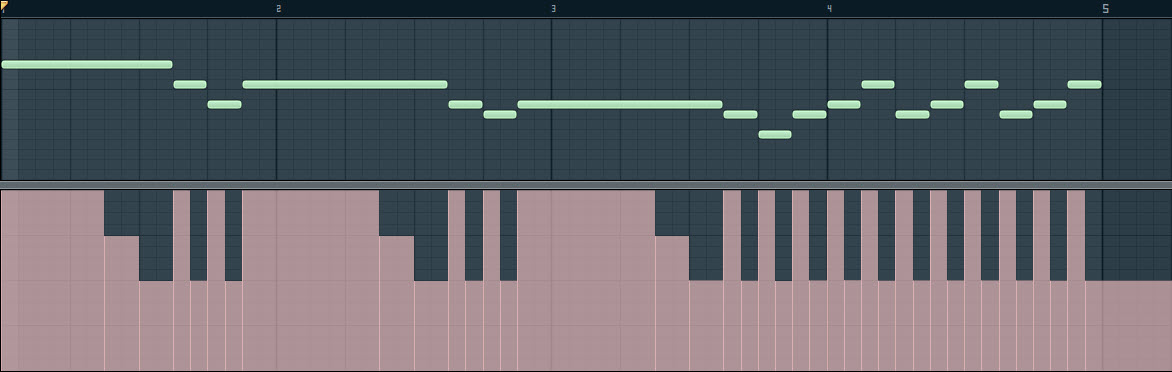
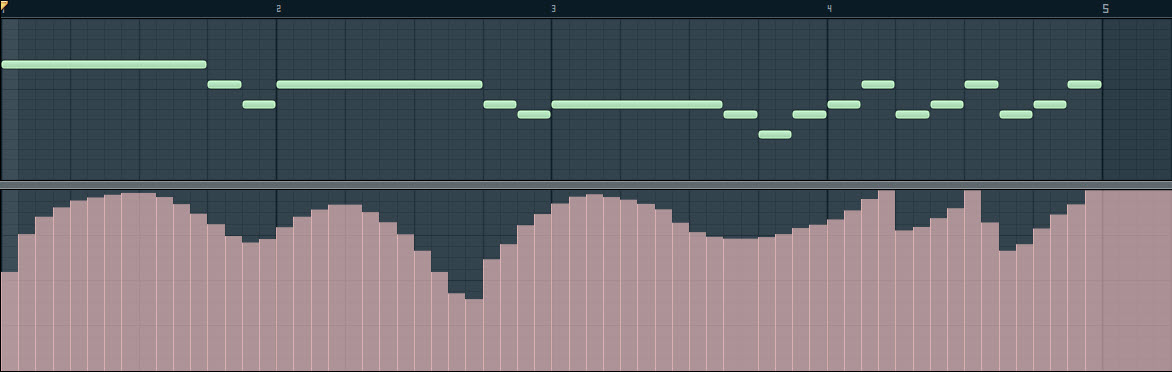
2) Channel Volume - this value, much like note velocity, is not a custom CC. It is also a value that, depending on your DAW, is most likely not controlled within the piano roll but rather by an event editor, automation or some other similar method. What this likely entails is an expandable window within the piano roll area that allows you to manually draw volume changes, as well as values for every other control parameter (this will be crucial for controlling everything from the volume and pitch to duty cycle and other custom control parameters). In FL Studio, there is a draggable bar at the bottom of the piano roll window that can be moved upwards to expand the event editor (again, your DAW may refer to it as something else). The event editor is similar to the piano roll in the sense that from left-to-right determines the time in the track and from bottom to top pertains to the low-to-high values of the control. If you recall, we assigned all of the custom control knobs in each of the MIDI Out channel settings a value range between 0 and 127. This is the standard range used by MIDI and therefore the acceptable range for each control knob. However, each CC has a different range of its own and as a result, the division between steps of this range will equate to the standard 127 value range divided by this more specific value. As an example, volume control on the pulse and noise channels is limited to 16 steps, which means any value in the event editor set to between 0-7 will result in the same level of volume, 8-15 will result in the next step up, then 16-23, 24-31, and so on in increments of 8 with 127 being the max volume. As another exampe, the duty cycle parameter is restricted to 4 steps so there will be increments of 32 used for that control (but more on duty cycle to come). This manner of control is most useful for controlling volume levels on longer notes but can be used for shorter ones as well.
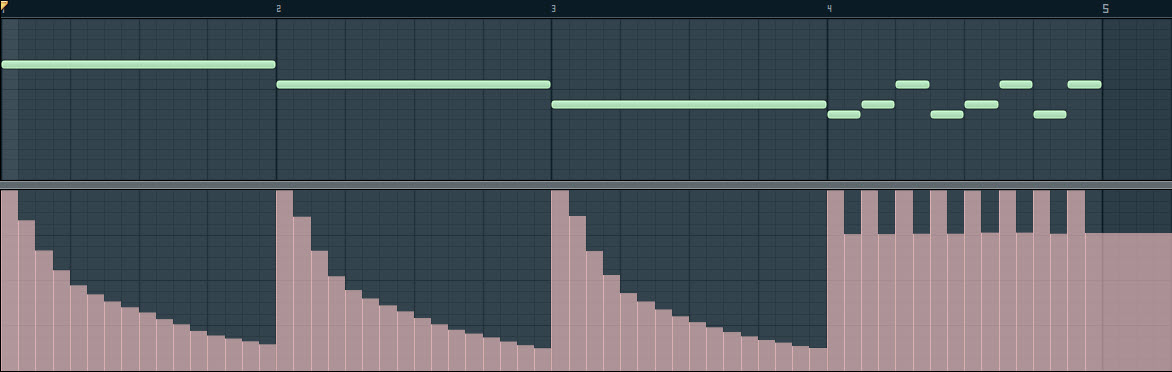
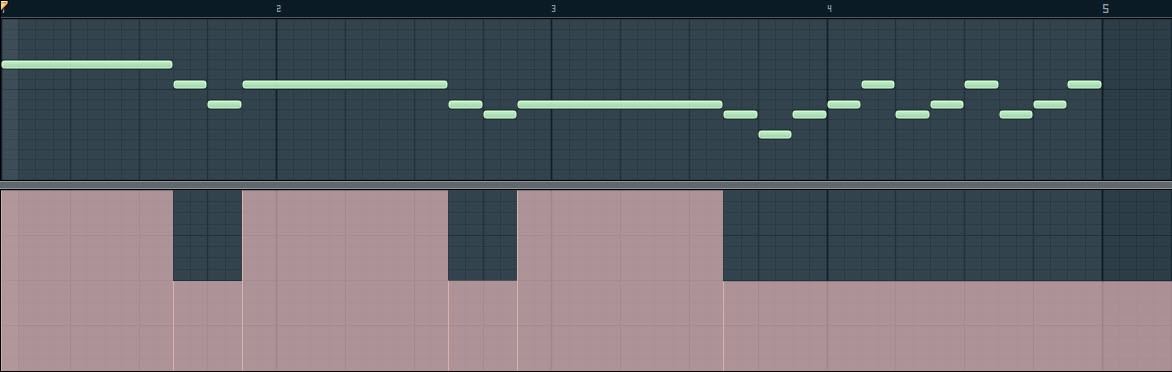
3) Volume Envelope (CC#11) - this custom CC is used to toggle an automatic decay for each note. Decay is how quickly the note transitions from 127 to a 0 volume value (or rather, from 16 to 0 as these are the steps available). This is extremely useful if you have relatively short notes (less than half or whole notes) and many of them, so you don't have to manually draw the volume changes for every note in the event editor, only draw a value to determine the rate of decay (more on that two paragraphs down). The volume envelope control only has an on or off value (two steps) so drawing a value between 0 and 63 will give the notes a decay while a value between 64 and 127 will result in a solid, continuous note. This control confused me a lot at first as when I set the value below 64, I was stuck with the default decay rate. This is because there are two other parameters we need to set in order to determine the nature of this decay.
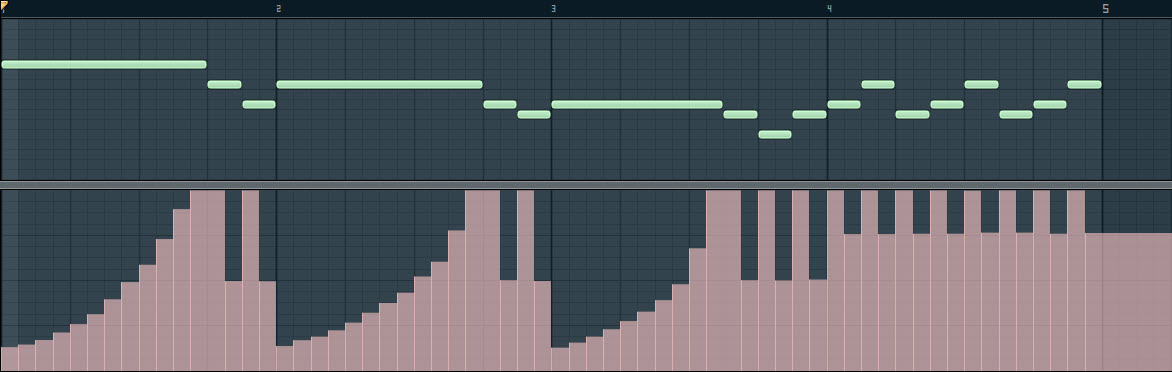
The first parameter is the Loop Envelope - this is another on/off value that I habitually always assign to the same value as the volume envelope depending on whether I want notes with decay or solid, continuous notes. This is because the loop envelope determines if the note is played once through or if the decay rate returns to max volume after it reaches 0. It can be useful to have the loop envelope value at 64 or above while the volume envelope value is below 64 if you want a note that repeats itself over it's full duration at a set rate (more on setting that specific rate in the next paragraph) but you can also just place multiple notes on the piano roll, one after another, at specific intervals to get the same effect, hence the reason why I generally just set the loop envelope value to match the volume envelope value.
The second parameter used in conjunction with the volume envelope is the Channel Volume. We touched on this above when discussing manual volume changes set in the event editor but in this case, the value set will determine the decay time, not the start volume. In other words, the higher the value, the longer the note will hold before it eventually reaches a 0 value and the lower the value, the shorter that duration will be. While the channel volume has a standard 0-127 range, the intervals between changes are the same as the channel volume itself - in other words, you get 16 total steps of different decay duration. These times are also set by the clock on the chip, I believe, and are not based the tempo of the track, so what this means is that any notes longer than a certain duration (determined by the channel volume value) will fully decay (reach 0) before the track plays through to the end of the note segment in the piano roll. If the loop envelope value is set to below 64 then the note will simply not be heard after this 0 value is reached. If the loop is, however, set to 64 or above then the note volume value will be set back to max and repeat the same decay duration and continue to do this until the note segment ends. Depending on your track tempo, and since the tempo does not change the note decay duration, this rate of repetition may or may not be in synch with the track's time signature. Since it's difficult to coordinate the decay value with the BPM (Beats Per Minute) of a track and given that you're limited to 16 steps in duration, I rarely use this 'offset' combination of loop and volume envelope values. In fact I only have ever used it in one track and I got lucky that by having the track at 75 BPM and the channel volume value set at 64, the note repeated exactly every 3/16 note which, while not in time with the quarter or eighth notes, sounded nice. You can hear this part of the song here at about 2:33 into the track. Starting at that time in the song will play through the same repeating measure once without the loop enabled and again with it so you can hear the difference (on the higher of the low-end notes).
In summary, volume can be controlled multiple ways depending on how you want it to sound or what level of ease you want to be available.
For long, continuous notes, the volume and loop envelope values should both be set to 64 or above and you can either set the single note velocity or overall channel volume to the desired value. I usually set the channel volume to max and adjust the note velocities for segments of the track with solid notes.
For notes with decay you can either draw the volume changes in manually, which is necessary for notes too long for the preset decay values (and useful for less linear decays, volume 'fade in', or more organic volume changes) or you can set the volume and loop envelope values to below 64 and adjust the note velocity or channel volume to achieve the desired decay rate. I rarely use the single note velocity for this and prefer to adjust the channel volume values in the event editor so that I can see all volume changes in the track along the same control timeline.
A few things to note before we move on.
When the volume and loop envelope values are below 64 (for automatically decaying notes), the initial value of the volume of the note will always be max. It's only the decay rate that changes with channel volume or note velocity values. For this reason, I also generally have other solid notes at or close to full volume so those that utilize the volume/loop envelopes don't overpower the rest.
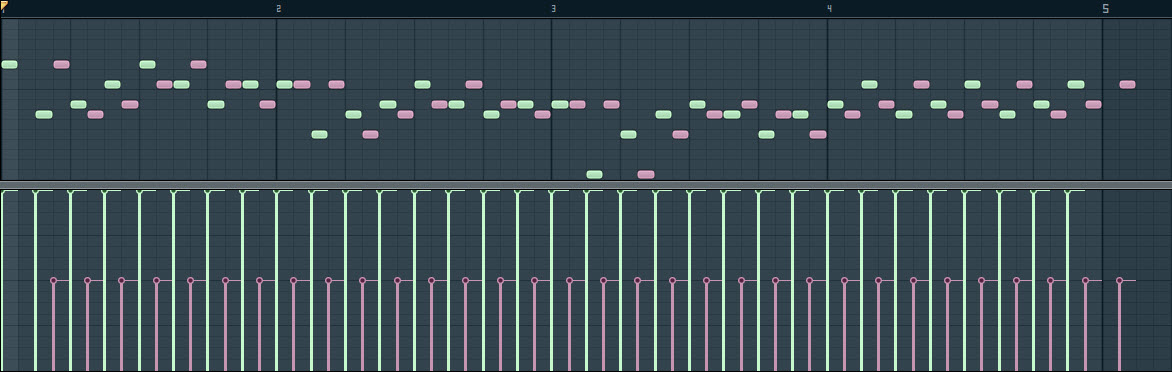
When drawing volume changes manually in the event editor, any value below 8 will produce no sound (this applies to note velocity as well). Conveniently, FL Studio has the event editor on a grid divided into 16 rows so I know not to draw any volume changes within the bottom of these rows.
You can also edit individual note velocities in the event editor. In FL Studio, these are thin, vertical bars, the top of which represent the value. This is useful for setting the individual note velocities of a group of notes at once or seeing them in relation to one another across portions of the track. This is most useful when creating noise channel drum lines, but more on that later.
Pitch Bend
Pitch control is one of the coolest things to play with but to be perfectly honest, it's also very time consuming. Your composition may not require any pitch bends whatsoever but it adds so much depth and character to a track (especially leads) that it's well worth the time you'll put in.
Where many DAW's give you automated ways to control pitch, doing so with MidiNES requires manually drawing all changes that don't adhere to set bend times (the next paragraph touches on this a bit). At least that's how it works in FL Studio. Now, your DAW may allow you more flexibility concerning this (FL Studio gives no way to control channel pitch in the piano roll but rather this is done via the event editor), and perhaps there is a way in your program of choice to not only more easily apply channel pitch (and channel volume) changes to the individual notes, but also allow you to copy and paste these changes as you would with the notes themselves. However, FL Studio and many other programs do not afford you this luxury within the piano roll composition. Although you can't copy and paste event editor data in FL Studio (again, maybe your DAW enables you to do so), much later I'll touch on my approach which makes the process a bit simpler than you might think so it won't be as much of a hassle to draw pitch bends or volume changes the same way for repeated segments (eg a chorus that you want to sound the same every time it comes up). Of course, if you're using a sequencer like FL Studio, you can always separate your track into multiple patterns and have any repeating parts simply reused that way, but for other reasons, I personally prefer to have all of one track in the same pattern so transitions between parts of the track are easier to control if they don't have clean 'breaks' between them (eg no overlapping channel volume or pitch changes).
When it comes to simpler or more consistent pitch bends, the CC's that include 'Sweep' in their names operate similarly to how the volume and loop envelope CC's can be used in conjunction with channel volume to control the decay rate of notes. Except that for pitch bends, there are more CC's to manipulate. I'm not going to go into these parameters (even though we did set them up on our MIDI Out) because drawing in values on multiple CC's can become time consuming and confusing, and I prefer to manually draw in pitch values directly to the channel pitch (not a CC) within the event editor. In fact, I don't even use the fine pitch (CC#8) as controlling that is still more time consuming (albeit not as limited) than doing it all by channel pitch changes. Essentially, I sacrifice a bit of capability for ease of use. You may be willing to put in the time to learn how to manipulate the fine pitch but for me, channel pitch alone is sufficient for all pitch related events. I won't go into it much here because I'll cover it later on but suffice to say that chiptunes have a lot of creative ways to fool your ear into sounding like something more complicated is happening when a simpler solution has been implemented.
In other words, you can use one parameter (channel pitch) to control vibrato, bends, etc. and have a more control over them in many cases, or you can attempt to adjust the values of four different controls (CC#13-16) for pitch bends and use yet another control (Fine Pitch, CC#8) to create vibrato. Again, you may prefer fine pitch to channel pitch but as they operate similarly, I'm only covering channel pitch.
Simply put, drawing changes for channel pitch into the event editor will allow you to raise or lower the pitch of the notes by varying steps. Straight forward, right?
The two main uses for this are pitch bends (perhaps from one note to the next to simulate portamento, or note slide) and vibrato. Vibrato is essentially a series of quick transitions between pitches on the same note to offer a 'trembling' quality that many vocalists have when they sing. Generally, I create these vibratos by drawing the value one cent (cents are how pitch steps are measured) above and below the center line, intermittently, at the desired duration. I tend to use 1/2 steps in most tracks as this seems to be a good balance between a good sound and not too much work (consider that drawing them at 1/4 steps would take twice as long). Sometimes I'll increase these values to 2 or 3 cents for greater change over time while other times I'll space them out with centerline (no pitch change, 0 cent) values separating them for slower vibratos. I'll also draw a transition from a few cents below to a few cents above and back down, repeating, to accomplish smoother, longer vibrato. This can also be useful for creating a detuning effect, to sound more like an electric guitar, for example. Basically, the higher above and below the centerline you place your values, the more 'wild' the bends will be and the closer together you place them, the faster they'll be. I'll touch more on different styles of vibrato later as well as transitioning between them over the course of a single, longer note.
Duty Cycle
This defines the way each pulse channel will sound and if you're familiar with Gameboy parameters or general analog sound generation, you may also have heard it referred to as "pulse width". This value has four steps (12.5%, 25%, 50% and 75%) and changes the 'quality' of the pulse sound.
- At 12.5%, the pulse will sound sort of like a stringed instrument (like a steel stringed guitar if there is decay on the note) at higher frequencies and a slap bass at lower frequencies. It's a rougher, 'dirtier' sound that has a ton of uses and I rarely compose a track without using this specific value multiple times over the course of the composition.
- At 25%, the pulse will sound a bit smoother and fuller, sort of like a trumpet if the note is held or an electric guitar if played with decay (and some channel pitch changes to give a detuned effect).
- At 50%, the pulse will sound very familiar as this creates a sound that most closely resembles the classic 8-bit video game sound of the lead part in the Super Mario Bros. and The Legend of Zelda theme songs. It has a very full, clean sounds great for leads at higher frequencies and something resembling a Moog bass at lower frequencies.
- At 75%, the pulse is very similar to the 25% value but sounds a bit fuller and has a tad more 'punch' to it. These are similar because they are created by the same waveform only reversed.
Basically you get your choice of 4 'instruments' (arguably 3 if you don't hear much difference between the 25% and 75% values) from each pulse channel. This allows for a number of combinations and as a general rule, I usually don't set both pulse channels to the same duty cycle value because having the same 'instrument' play two parts isn't as interesting as having two different 'instruments' play two different parts! Of course there are great applications for all combinations but more on that when we discuss composition techniques!
Length Envelope
This is a parameter (CC#9) that I don't use because all it basically does is shorten the duration of the note being played which is something you can determine when you draw notes on the piano roll. Unless you're in the unfortunate circumstance of working with a sequencer that doesn't give you control over the length of notes via the built in interface, you won't need this. I do, however, set this parameter to the max (127) on both pulse channels for every track I create to ensure that the note length is never shorter than what I draw on the piano roll. This is the default for MidiNES so it's not necessary - it's just a habit I got into in case I ever do decide to use the length envelope parameter for any reason in the future and don't want it to be set to a different value if I switch between working on different tracks. Of course, it's easy enough to reset the NES and all default parameters will be applied, but it's just a good practice for me.
Okay, that should do it for the pulse channels! Onto the others. These portions will be significantly shorter...
As I said before, I'm not going to go into parameters that I almost never use. Feel free to explore them for yourself if you're creating more 'experimental' music but for most compositions, they're not crucial.
USING THE MIDI CC'S FOR THE TRIANGLE CHANNEL
As mentioned earlier, the triangle channel has no volume control which means no CC's for volume, loop, etc. It also doesn't have any duty cycle or pulse width as it always generates the same tone.
It does, however, have pitch control which is identical to the pulse pitch control using either fine pitch (CC#8) or channel pitch in your DAW. As such, I also prefer to use the channel pitch but fine pitch is a greater consideration for this channel as the pitch steps are further apart so if you want more subtle vibrato or smoother pitch bends, you may want to look into using this instead.
As an additional note for both the triangle and pulse channels, pitch steps get further apart with higher frequencies. In other words, if you change the pitch to +1 cent on a high note, it will jump further than the same +1 cent step on a lower note. For this reason, when controlling pitch via either fine pitch or channel pitch, be more conservative with high notes and more liberal with lower notes. In my experience, I need to change the value on lower notes 3 or 4 cents before the difference is noticeable while on higher notes, I tend to space out lower values to avoid sounding too 'shaky'.
USING THE MIDI CC'S FOR THE NOISE CHANNEL
This is a rare case where I never use the custom MIDI controls. If you do decide to utilize them, they operate similarly to the same ones detailed in the pulse channel uses above. Volume, loop and length envelopes are available but the noise channel is unique in the sense that there is little to no difference in the sound of a single long note and a series of short notes placed one after another. This affords us the ability to change the volume of the noise channel without manual drawing in the event editor. That is to say, if you place 16 short notes in a row at descending note velocity values, it will sound almost exactly the same as a single note occupying the same duration with a manual volume change drawn in the event editor at 16 equal, descending steps across the duration of the note. Also, since I can copy/paste notes (and associated values) but not event editor data in FL Studio, I always construct my noise channel tracks from groups of short 1/4 or 1/8 step notes that change in single note velocity across the duration of what I construct as separate 'instruments'. This is much easier and far quicker than drawing in the event editor for every single note, plus it affords us unique possibilities for giving the illusion of mutliple drum-like sounds overlapping! More on that later...
USING THE MIDI CC'S FOR THE DPCM CHANNEL
The only control I use for DPCM currently is the Bank Switch (CC#14). This simply switches between the sample sets loaded onto the MidiNES cart. Each bank has 128 samples for a total of 256 (mostly) unique percussion-based sounds to choose from. Although a good variety of samples are included, if you search around the Internet, there may be available documentation for how to load custom samples with additional hardware/software. I'm more musician than modder so I haven't explored this option much. Also, since I tend to use the noise and DCPM in tandem for drums (and often times will use only the noise channel), I don't use as many different DPCM samples as I might if I was utilizing the DPCM alone, and I don't really consider using the pitch (CC#3) since the variety of available preloaded instruments include toms and other drum sounds at varying pitches already. I also usually stick with the default bank as it has more basic percussion samples but you can switch between them with a value below 64 for one and 64 or above for the other.
An additional note to close out this portion of the tutorial:
The parameters I've covered here reflect only a portion of the potential for MidiNES and I realize that. However, in an effort to keep the focus on composition and in the spirit of overcoming limitations and pushing envelopes, I've only really covered those which I consider to be absolutely essential for creating creative but more 'standard' compositions. Why else would we be making music with some of the most basic hardware available if we didn't love the challenge!?
Last edited by Doctor Octoroc (Jan 19, 2019 7:59 pm)