Hey guys, been a while since i posted on here. Been super buisy building some modules for clients. I finished the first NES MPS a while ago and though i'd post one of the few demo videos i filmed before shipping it of to its new home in NY!

Video Here: http://youtu.be/NH2uBjfDRjI

Enjoy!

Im in the process of making the next NES MPS for a client who's identity will be revealed soon. Im adding a lot more features, just to run through several of them...

-Dual GBA SP consoles (synced together)
-Built in arduino boy (MIDI in and out)
-2 Stereo analogue low pass resonant filters
-Distorion circuit
-LoFi Delay
-Fold down screen

I'll be posting the progress here and on my blog (The propper website is still under construcion) Im also buying a CNC router in about 2 months. Im going to set up an acrylic cutting service in my spare time so keep that in mind guys!

Good point, changing it now. well the title atleast. i think the description and pictures make it clear enough.


eBay listing: http://www.ebay.co.uk/itm/300659035747? … 1555.l2649


The NES MPS V 1.0 [Prototype] (NES - Music Production System)

By LoFI Future (LoFiFuture.Tumblr.com)

I have spent hundreds of hours soldering, testing, sanding, fabricating, designing and bassically losing my sanity with this project but it's all been worth it. And now its finished i want to sell it to a lucky bidder so i can get the funds to build another one so i can make a step by step tutorial for anyone who wishes to make one themselves. This auction includes the NES MPS module, Its power brick and an ABS flight case for transport. Unfortunatly i cant afford to include LSDJ or Nanoloop. To see the build process go to my blog (LoFiFuture.Tumblr.com

The 8Bit MPC:

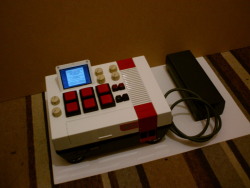
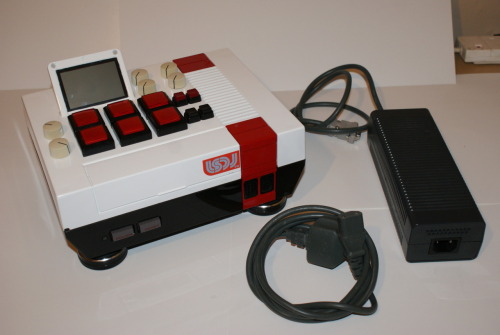
    This is the first of its kind. An 8 bit music production workstation to run Nanoloop or LSDJ. Its based off a GameBoy advance SP and built into an old NES case. There is also a 16BIT FX processor built in to apply FX to the Game boys output or an external device via the 1/4” jack inputs. The Processor also doubles as a 2 channel mono mixer, so you can mix an external device and the gameboys signal.

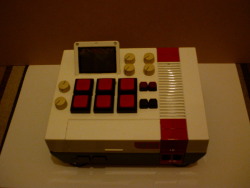
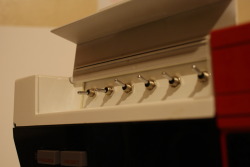
    The switches under the “hood” are for the FX processor On/Off and the LEDs On/Off. Two of the switches are to select whether you want the gameboys signal to be processed by the FX processor and come out the 1/4” jack out puts, or to just go straight to the dedicated RCA outputs. I have left two of the switches unconected for the next owner to do what they wish with (maybe overclocking mods?)

    The big square arcade butons control Up, Down, Left, Right, A and B. The 4 smaller swithes are for Start, Select, Left shoulder and right shoulder buttons. The 2 pots to the left are the FX slect switch (select reverbs, flanger, rotary speaker, chorus or delay) and the LED dimmer switch witch i may relocate and use the pot there as the gameboys volume out. The 4 pots in a cluster are channel 1 input, channel 2 input, channel 1 mix and channel 2 mix.

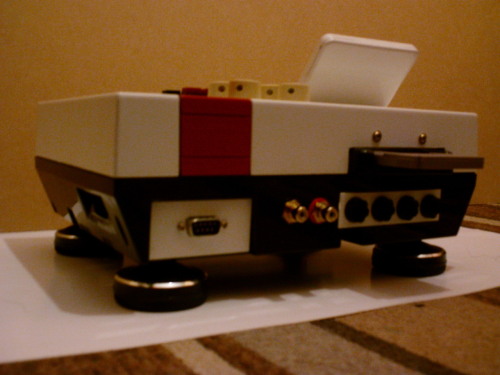
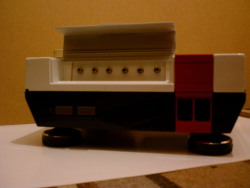
    The power suply is 3 transformers housed in an old XBOX power brick and connect to the console with a 9 Pin D-Sub connector. The gameboys body that holds the circuitry can be easily removed by unplugging the 25 pin D-Sub (witch carries the controlles, power, audio) and removing the 2 screws at the back. This allows for easy maintenance, modification or if you simply need to change the battery.

    The console only needs the power brick to power the LEDS, the FX processor and charge the gameboy. You can run it standalone off the Gameboys battery if you just want the gameboys audio clean.

As this is a prototype there are a few imperfections such as the little chips on the two front corners, and the black paint on the back had to be patched up. But overall it looks stunning really. All the paint was done in a proffessional spray booth and all the white metal panells were machined out by an experianced metal worker. The module sits on 4 turntable feet witch can be easily removed.

Anyway, good luck guys! i hope this goes to a good home. Demo videos will be avalible in a day or two. If you want anymore info just message me or email at [email protected]

Im glad you like it guys! im glad to finally finish this thing now. I've put it up for sale on eBay. Starting price 99P International postage avalible. Just type in NES MPS in ebay and it'll come up. I cant wait to start the new one. Thinking of having Dual gameboys in there synced together. But thats all im saying for now wink

More pics!


The 9 Pin D-Sub on the back is to carry the 3 voltage rails intro the device from the power brick.

Hi guys, it's been a while. Sorry i havent posted on here for ages. Iv been very buissy.

Good news though, ive almost finished this project!

Im going to post a more detailed explenation of what i've dont since i last updated you all. But im tired so im gonna leave it for now.

I will leave you with some pics at the moment. Better picutres + a demo video with LSDJ coming soon!


DKSTR wrote:

Looks cool, but MPCs strong points are not the shape of buttons, its the whole workflow and ui in itself.. And unless I miss something pretty significant from LSDJ, this is far from MPC.

But I guess with some clever arduino usage + arduinoboy + something like Akai MPD could work.. I really love use my mGB with MPC.

But still, really cool and good job, looking forward how this develops!

well ofcourse. The only MPC thing about this is the looks. I didnt really make that clear on this thread. I do like your idea of using an auduinoboy, some pretty rad possibilities there.

Anyway, regardless. im glad you like and stay tuned as theres plenty more progress being made!

25

(14 replies, posted in Tutorials, Mods & How-To's)

Yeah thought i'd give it a bump as this information is still relevent to alot of people.

Nice mod man!

26

(14 replies, posted in Tutorials, Mods & How-To's)

Try finding a 1/4" jack socket meant for a guitar. You can get ones that are a slimline fully encased barrel design.

Like this:

There pretty long but much thinner than standard pannel mount jacks

The paint job looks stunning! And the text really does show through well. Thanks for this, now to order some of that paint...

28

(12 replies, posted in Tutorials, Mods & How-To's)

Apeshit wrote:

In the very least, this can serve as information to do a 1/4" headphone mod.  But this tutorial is soon to be completely useless when Kitsch comes out with his new shells, because a 1/4" jack can be mounted on the right side now.

Just checked this out on the site. You got me all excited now. Im deffinatly getting a purple shell when there ready!

EDIT:
Oh i see, we vote on what we want. I recomend everyone do so!

29

(12 replies, posted in Tutorials, Mods & How-To's)

Nice and clean mod. I hate using 3.5mm jacks, they break easily, come out the plug easily and are harder to find if you lose the end of a long cable. I consider 3.5mm jacks as a personal music connection, wouldnt really like to use it on anything else other than my ipod. Even when using my headphones in the studio i prefer a 1/4" jack. It's all about the durability.

Definitly going to be using this jack placment on my next gameboy mod.

nickmaynard wrote:

huh! that looks really good in those later pictures. the paint job is great.

where does your dad work?

Thanks, my Dad paints aircraft for a living as a contracter. So he can do the odd job for me in a proffesional spray booth with all the gear.

ChipsChallengeBand wrote:

Looks awesome!

I'm going to assume NES controllers won't work, though, lol

Funny you should say, Im currently wiring the controller ports to the GBA controls to add this feature wink

BR1GHT PR1MATE wrote:

damn, looks awesome. let's hear it in action!

Hey thanks, iv got sort of a test video up at the moment, the link is in my first post. But i will be doing a propper test with LSDJ today or tomorow.