449 Sep 14, 2012 6:27 pm
Re: Post your Gig/Home cartridges (41 replies, posted in Nintendo Handhelds)
450 Sep 14, 2012 6:00 pm
Topic: thursdaycustoms TUTORIALS (21 replies, posted in Tutorials, Mods & How-To's)
If you're just getting into Game Boy modding then I highly recommend starting out by reading ASM's "Game Boy Modding Guide" found here:
http://chipmusic.org/forums/topic/6324/ … ing-guide/
There are many tutorials for many different mods all over the place. My plan is to write up tutorials for mods that I don't see guides for quite as much and update this post whenever I write a new one.
----------
START PEDAL FOR LSDJ
For starting LSDj without ever having to touch your Game Boy you can install a jack that is wired to the start button.
This is practical for playing live shows where your hands may be full with something like a guitar.
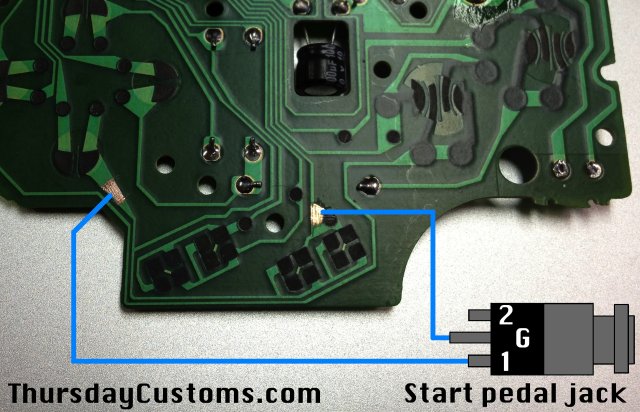
All you need to do is follow the 2 traces of the start button back to where they become a bit wider(use a razor blade to scrape off the solder mask(coating over the copper traces)).
Solder two wires to these newly exposed pads.
I recommend using Kynar 30AWG wire and securing them with just a small dab of hot glue.
Wrap them as pictured so they are not in the way of the button pads(you could also run the wire that is right above the start button straight up through the opening in the PCB that has a capacitor).
Using a panel mount 1/8" jack hook up the wires to pins 1(left/tip) and 3(ground/sleeve) for a stereo jack. A mono jack will only have left and ground pins which would work just fine. You can purchase 1/8" jacks on their own or prewired right here: http://thursdaycustoms.bigcartel.com/pr … -sound-kit
It does not matter what order these are in as you are just making a loop.
You will need a keyboard pedal with an open circuit something like this would work just fine:
http://www.americanmusical.com/Item--i-MUS-KSP20-LIST
This particular pedal has a switch for open or closed circuit.
Open up the pedal and remove the 1/4" cable by heating up the solder on the pads where it is connected.
It will likely only have 2 wires from the cable connected to the switch.
Wire these up to another 1/8" jack in the same way as the first one(pin 1/left/tip and pin 3/ground/sleeve).
Solder this jack to the exact same pads that you removed the 1/4" cable from.
You will likely be able to just mount the 1/8" jack in the hole where the original cable was.
Get yourself an 1/8" audio cable(mono or stereo) and try it out!
----------
There seems to be a lot of different information about link cables and link ports on the internet. I came up with this handy like image to hopefully clear it up. Let me know if you think I should add/change anything!
----------
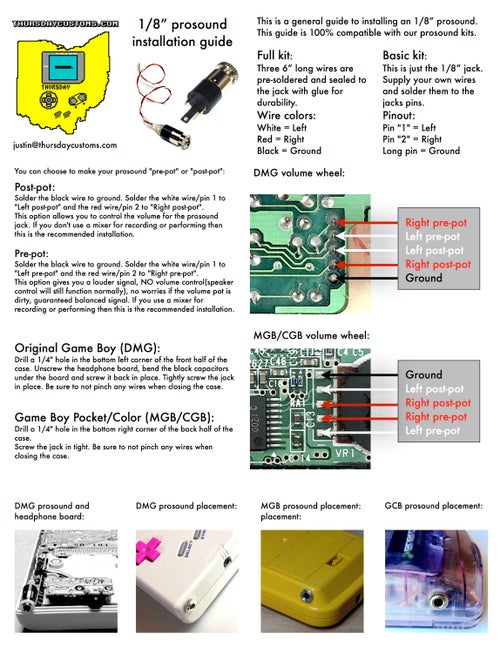
Prosound mod tutorial. While this tutorial is geared towards the 1/8" mod is has some good information that applies to all prosound mods such as pre and post mot installation:
TIP: Open images in new tab for higher resolution. Feel free to print them out or share them!
451 Sep 14, 2012 4:41 pm
Re: NEW ARDUINO BOY PREORDER (304 replies, posted in Trading Post)
This would be very useful for me live! I always have my hands full at the start of a song.
That's exactly the idea! I play c64 and/or guitar live as well as sing so it can be very helpful!
453 Sep 13, 2012 8:24 pm
Re: ASM - PCB Mount Pro Sound V3 @ Retromodding (494 replies, posted in Trading Post)
Oh wow I don't know how I missed that. Right on. I have the turquoise screen cover on my Kotsch shell so I think I should get those! ![]()
454 Sep 13, 2012 8:14 pm
Re: ASM - PCB Mount Pro Sound V3 @ Retromodding (494 replies, posted in Trading Post)
Site looks great!
Which color are these here?
Cool blue? Probably going to order some. It wouldn't hurt to put some text at the bottom of each picture with the color name OR have the picture change to the appropriate color when choosing a color in the drop down menu.
Sometimes they can be hard to tell apart. I would have called then cyan but that could just be my monitor.
455 Sep 13, 2012 1:44 pm
Re: ENIO - Ethernet, USB, SD, etc... (63 replies, posted in Nintendo Consoles)
Very interesting!
456 Sep 12, 2012 11:41 am
Re: NEW ARDUINO BOY PREORDER (304 replies, posted in Trading Post)
Thanks a lot man!
457 Sep 12, 2012 2:55 am
Re: NEW ARDUINO BOY PREORDER (304 replies, posted in Trading Post)
Pretty much. A good balance for each color and then a resistor on the voltage leg to bring everything down just enough to not draw too much power.
458 Sep 12, 2012 2:45 am
Re: NEW ARDUINO BOY PREORDER (304 replies, posted in Trading Post)
True. I misspoke. It's parallel no series. The details and wiring diagrams will be listed within a week.
459 Sep 12, 2012 1:27 am
Re: NEW ARDUINO BOY PREORDER (304 replies, posted in Trading Post)
Hahah the kit itself shouldn't be too much. It will include two assembled PCBs and wire. Probably about $15.
461 Sep 12, 2012 12:05 am
Re: NEW ARDUINO BOY PREORDER (304 replies, posted in Trading Post)
^ someone commented recently that the RGB boys should happen, woot
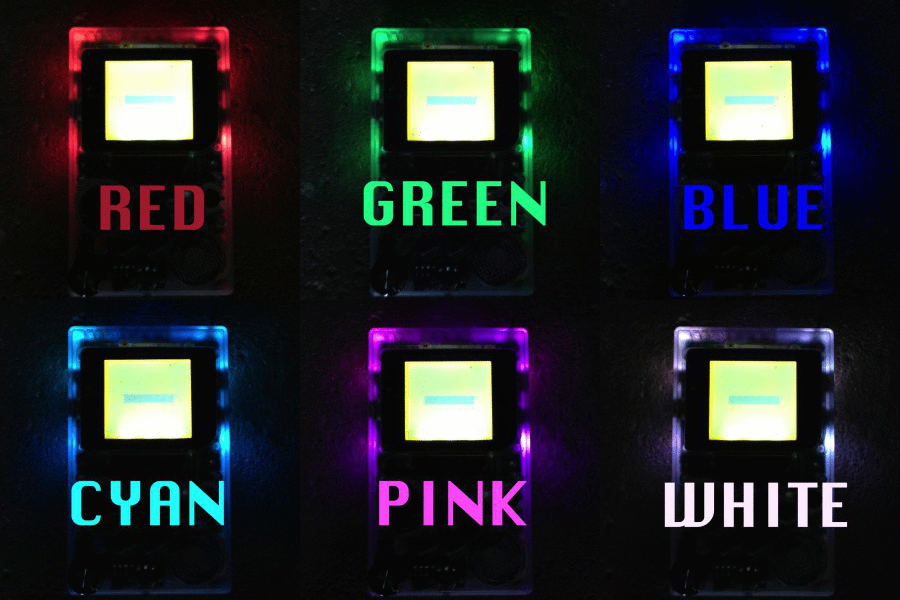
Meaning RGB case LEDs should happen soon? I've done a few of these for commissions!
RGB has been my shit lately. Completely obsessed with finding new ways to mess with it.
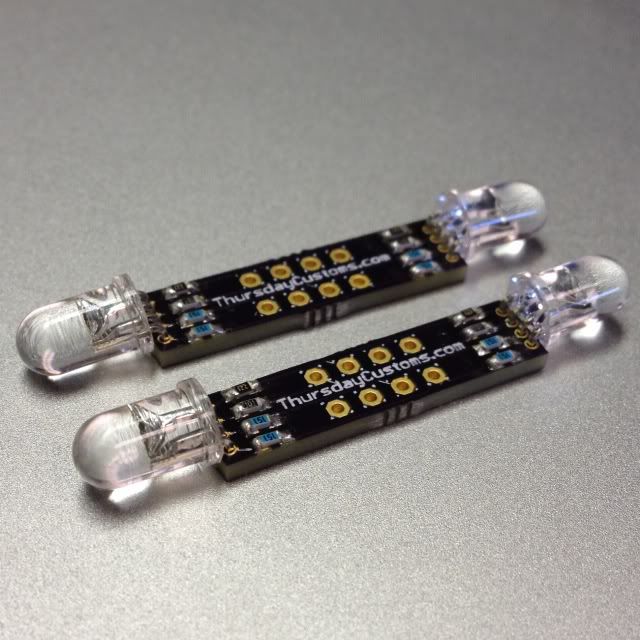
There are two PCBs in that clear boy each with 2 LEDs. Very easy to install. They should be available on my site in a couple weeks!
462 Sep 11, 2012 11:34 pm
Re: NEW ARDUINO BOY PREORDER (304 replies, posted in Trading Post)
463 Sep 9, 2012 2:49 pm
Re: looking to buy a crystal oscillator (6 replies, posted in Trading Post)
I just dropped the international shipping charges to $10 by the way.
464 Sep 9, 2012 2:42 pm
Re: NEW ARDUINO BOY PREORDER (304 replies, posted in Trading Post)
ALSO I've dropped shipping charges on kits for international. It was at $20 because I was doing priority with insurance. It's now first-class with insurance. Got a few e-mails about this.


