Skip to forum content
ChipMusic.org
chipmusic.org is an online community in respect and relation to chip music, art and its parallels.
You are not logged in. Please login or register.
Search options (Page 1 of 2)
ChipMusic.org / Forums / Posts by soulgun16
Topics by soulgun16
Posts found: 1-16 of 18
nitro2k01 wrote:Yes, there are a few extra hoops you would need to jump. The SGB depends on the code running on the SNES to start the CPU, as well as the SNES for generating a clock signal. Actually, it's a little dance back and forth. The hardware interface for this is described here:
https://problemkaputt.de/fullsnes.htm#s … pergameboy
You need to either activate the GB CPU using port 6003 as described in the link, or tie the reset line for the GB CPU high to allow it to run. However, tying the reset line high also makes it impossible to use that SGB as a regular SGB, because it relies on the software being able to reset the CPU.
SGB1 relies on the SNES's clock to generate a CPU clock for the GB CPU. SGB2 has its own clock crystal, but the same 6003 register has a speed setting which may be set wrong on startup, with no SGB firmware to set it correctly. You could possibly disconnect the clock lines from the ICD2 chip and use a clock crystal donated from a DMG instead. Such a mod has been done previously to restore the correct CPU speed and sound pitch so it's probably documented somewhere online.
Another little wrinkle is that the boot ROM of the SGB CPU, unlike the DMG CPU and all others, doesn't check the if the ROM header is valid. On the SGB CPU, the ROM header is instead transferred to the SNES side and validated there. So if you make your own software, it should probably do some validation so it doesn't crash. Especially important if's handling any kind of save data.
Another thing to consider, how would you get input to the SGB? You would need even more modding if you wanted to add buttons. You could do something like an internal Arduinoboy mod for receiving MIDI though.
Is it all worth it? You decide.
Wow, there were definitely a lot more factors than I originally thought, it's really interesting how that all interacts and other online info sources kind of mislead a bit by making it sound like the SNES is just doing basic video and audio. The intent would be attaching an Arduinoboy and using it as a synth which would make it less expensive than a whole Gameboy and also make me feel better about not gutting an original Gameboy for an internal application. Thanks a lot for the deep dive and for responding, I don't think I'd be able to pull it off based on the info you gave which is a bit of a shame...but maybe someday in the future I'll be able to tackle some more complex mods to achieve this. In the meantime I guess I'll just keep a new bookmark and a deeper understanding into the super Gameboy. Thanks again!
Hello, I might be completely off base here since I've never seen anyone else do this, but from what I've gathered the SGB is just a full Gameboy shoved in a cartridge and all the SNES is doing is processing the video and sound, and even then people have pro sound mods for SGB. So my question is ultimately, is there a reason you couldn't just pro sound an SBG and provide power to it and then use it as a headless synth? And if that is possible are there additional hoops to jump through? Just curious
Hello! I am working on converting a super gameboy and was hoping to add pro sound to it, I've seen in several places that its just a dmg re-shelled (or very similar) and I wanted to add the bass boost mod to it as well if possible. Looks like the typical choice is 200uf 50v but when I look at the capacitors on the SGB I only see 3 and none seem like they would fit the bill for this kind of mod. Would changing the capacitors you wire to for prosound be the solution? If so does anyone have a recommendation for uf or just stick with the 200? Or is there something I don't realize and is there no point to even doing this mod? I just felt adding a little oomf to the output would be nice, thanks in advance for replies!
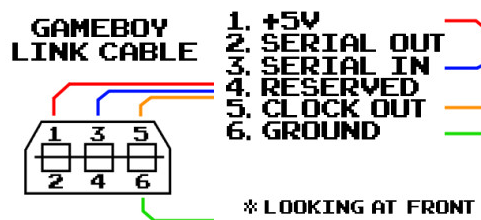
Duck wrote:you can get 5v from the link port (it's sometimes tricky to get a link cable connected to it properly, but you can always mod one...)
I have an arduinoboy that is powered this way, so you could use this to power the nano.
I think you can just use a step up converter to get from the lipo to 5v (but maybe do some googling as to one that is suitable to use with the lipo?).
Even though I knew most of what was in that article it was a good read, thanks for the input! I realized now that I forgot I am using 2 arduinos since one is my arduinoboy and the other is my own for the midi (I'm not proficient enough in programming enough to combine the two lol). That being said, I looked into some options and one easy method that may work for me is I found a powered USB hub I could plug into a batter or power bank and distribute power to each with a simple usb. Figured i would share to see if anyone had thoughts on that method, also is it more efficient to downvolt or up? Because I could get a 9v and downvolt it. Logic feels like lowering the energy would be easier than boosting.
Hello, I am currently making a project where I am using an arduino as a midi device and am going to wire in a gameboy with it enclosed in the device and use CC commands to control everything. I was looking into some powering options and trying to decide how to go about power distribution, I know the DMG technically uses 6v but it sounds like it can run off of 5v, and the GBP seems to use 3v and most people I have been reading about are fine with 3.7v powering. I figured I would jump over to the community as I know there are many people here with a lot of specific information on this. Essentially the arduino nano I am using appears to run at 5v, I was hoping to use a 3.7v lipo to power everything but after finding out the arduino needs 5v I was wondering what suggestions people may have for a singular power option. I have a spare DMG and GBP that both have broken screens I can use so really whatever battery/gameboy combo works best I am okay with.
Ultimately I wanted to confirm some of these values I was reading and see what people suggest, thank you in advance!
jefftheworld wrote:soulgun16 wrote:...I would be mostly unsure of how I would make the midi code communicate with the arduinoboy code directly since the midi controller code would be designed to output midi and the arduinoboy would be designed to be listening for input midi, and I'm not sure how to get them to talk together within the same code, I only plan to use mGB for this project though
Your Arduinoboy wouldn't be running a realtime operating system (RTOS), so it wouldn't be two programs that talk to each other through an OS but rather a single program that extends the Arduinoboy functionality to include your desired button-based inputs.
I don't think it would be on the easier side for someone who has not programmed embedded systems.
Oh alright, I see what your saying, thanks for the input!
Duck wrote:also, if you need more buttons than you have pins, it's super easy to use multiplexer chips to have one pin read loads of signals.
Teensy is a bit more set up to use MIDI off the bat, and there's a really simple guide to using multiplexer chips halfway down this page:
https://www.pjrc.com/teensy/td_midi.html
the controller I shared above is running all those buttons/sliders and faders from one Teensy (and a lot of multiplexers)
Thank you! I will definitely check all of that out 
Perfect, thank you! I ordered some new wires for it and I'm gonna start on it tomorrow, I'll post here afterwords for anyone interested.
Thank you! I have one last question, I know the N&V says uno, but I have a nano laying around, is it possible that I can use that instead? I thought I heard they use the same chip.
Orgia Mode wrote:Ok, since that one has DIN MIDI, I suggest making a separate midi controller with a secondary Arduino. You can make it far more interesting than just 8 keys. In fact, you can break out every mGB cc control to a knob as well as your keys. AND you can use an example code to start with! All you do is fill in the blanks. Besides, isn't an octave 12 keys...? I think the currently available TeensyBoyPro only has 8 extra GPIO and man, 8 keys would be so boring.
Watch part 1 and 2, then get back with us if you like the idea.
https://www.youtube.com/watch?v=DXhxdsGREsU
Notes and Volts! He's great, that's the exact guide I was going to use for my project! I found out about them thanks to look mum no computer, also you are correct, I was not thinking about the sharps/flats. So I'll just go with the double idea then, thanks for the help! I think I'll order an uno tonight and try to start getting everything going
jefftheworld wrote:soulgun16 wrote:Is it more trouble than its worth? (especially for someone who knows nothing about programming)
If you know nothing about programming then this project is definitely well out of your grasp for now. Arduinos make great platforms for learning electronics and software engineering but this project would require a lot of time invested in building up those skills before you could even begin to tackle this particular project.
Yeah, I figured its probably on the easier side of things but still requires a decent amount of startup knowledge, I would be mostly unsure of how I would make the midi code communicate with the arduinoboy code directly since the midi controller code would be designed to output midi and the arduinoboy would be designed to be listening for input midi, and I'm not sure how to get them to talk together within the same code, I only plan to use mGB for this project though
Orgia Mode wrote:Well, given an Arduinoboy made with an Atmega168 has 9 remaining GPIO, it would be feasible to add 8 buttons.
To add these into code though, we'll need to know exactly what you want to do with them and which mode you'll be using on the arduinoboy.
EDIT: Also, what arduinoyboy will you be soldering these buttons to? I only assumed it was running on an Atmega168.
I'm currently using the teensyboy pro from catskull, I'd likely try to make my own arduinoboy for this though using another teensy, unless you think it's worth it/easier to use an uno maybe. My biggest thing stopping me from making my own is that I have a hard time fully understanding what to wire to what to make one and I haven't found a super intuitive wiring guide, I do have the real estate for a bigger Arduino. I'm just making a one octave piano for starters, thus the 8 buttons.
Hello! I am still fairly new to electronic modding and have essentially zero programming knowledge. I have a project going to use an arduino and some buttons to make a midi controller which I was hoping to use with the gameboy. As it currently stands I have an arduinoboy I purchased and I could wire that to the arduino based midi controller to get it connected to the gameboy, however I would assume this is inefficient and I could use one arduino with the buttons connected to it and have it directly communicate with the gameboy. That being said I know arduinos have a limit to how much code and how many gpio ports they have, so essentially how feasible is it to connect my 8 or so buttons I was going to use as a midi controller to the existing arduinoboy and combine the programs into one? Would they clash too much or use the same ports making it impossible? Is it more trouble than its worth? (especially for someone who knows nothing about programming) Let me know thoughts and opinions on this! Please and thank you 
Hey so not sure if there's a particular reason why the gameboy is quiet, but I primarily work with colors, and they seem to just be really quiet unless you have something to amp them up, as for the noise they are also notorious for background noise out of the headphone port, good news is look up the noise reduction mod for gameboy color and there's a guide to install one easy capacitor that makes the noise almost nonexistent, did it on mine and it's a godsend
hello, upon trying something out with my gbc i accidentally removed the EM4 resistor to the point of no return, Im fine with just having like a line level internal pro sound or something on this gameboy, does EM4 matter grossly? Ive seen some saying yes and some no, and one that says it just switches between speaker and headphones which at this point it doesnt have a speaker anyway its going to be more of a studio gameboy. Anyone who knows or has some ideas of what to do from here would be great
Hello! I was using MGB with my arduinoboy finally when I turned on polyphony and I was like wow this is amazing! then I went on to be like, but sometimes It sustains infinitely...So I played around with it a bunch and I came to discover HMMM Its only the wav channel, channel 3, that seems to do it, and it was only that channel and every single time without fail it would play its last note forever. So I played around with all of the settings, sustain on/off, and all the other stuff I went through every option to no avail. I then searched all over the internet the best I could and I saw videos of people just using it without a problem, and every website i could find had no one else with the same issue. So I've come here once again to ask the community for help, I am using a GBC with MGB V1.3.3, If anyone has tips/suggestions let me know and thank you in advance!
Posts found: 1-16 of 18
ChipMusic.org / Forums / Posts by soulgun16