okay so i'm going to write the diff LED behaviours and if anyone could fill in the mode that would be great:
(when the button is pressed:)
LED1 flashing:
LED2 flashing:
LED3 flashing:
LED4 flashing: LSDJ Keyboard mode (finally got it working) - edit-
LED5 flashing: nanoloop (assuming? i dont have a cart) -edit-
LED6 flashing: mGB
LED 1-2-3 flashing:
ALL LEDs flashing:

As explained, the only mode i know is mGB and from my tests. when LED6 flashes, it means it's in mGB mode coz it works. other than that i can't get anything to work.

EDIT:
Found this floating online.... i really don't understand why a simple image like that isn't listed in the github readme.

herr_prof wrote:

If you do the manual. be sure to document the maxpat editor. It allows you to set the midi channels the various modes respond to:

To answer your questions: the 7th mode came after the hardware was set, and is indicated by a special LED lit modes.
You can set the modes using the maxpat, to run it you have to install the demo for max '7 and hook it up to a midi interface. You can set it to start on the keyboard mode by default when it boots as well.

yes! i already opened up the max editor even before building it just to see what it was all about! it's def handy but curently due to my malwiring on the midi out port i can't use it... i have to go in and fix it first... my box is a wire forest inside so i'm kinda worried about that haha... next build will have a much nicer protoboard instead of 4 diff ones floating in a wire stew!

catskull wrote:

I started a thread here hoping to improve the documentation. I can't tell you how much time I've wasted walking people through using LSDJ in keyboard mode. It is confusing and not straight forward. My goal was to write a little manual and distribute it under a GPL license just like the arduinoboy code is. Here's the thread: http://chipmusic.org/forums/topic/18179 … mentation/

I think I'll make a few posts in that thread that answer your questions. All of your questions are totally good and valid questions though. I forgot how confusing the LED's are when you don't have a nice PCB with text next to each one.

awesome! i'll def check that out right now and try to get as much info as i can from it... thank you for understanding my frustration... having such a lack of results when searching made me almost think i was the problem! but it IS confusing! at least at first. i understand that people get frustrated at first but when it all makes sense eventually they take it for granted.

herr_prof wrote:

Its all here:
https://github.com/trash80/Arduinoboy

well... i know where the github is and the readme i've read it a few times but i still find it confusing... perhaps it's just my limited brain... i'm more of a visual earner than with text. have a hard time concentrating when it's just white on black text. so i was hoping someone could help me by further explaining it and dumbing it down for me perhaps....

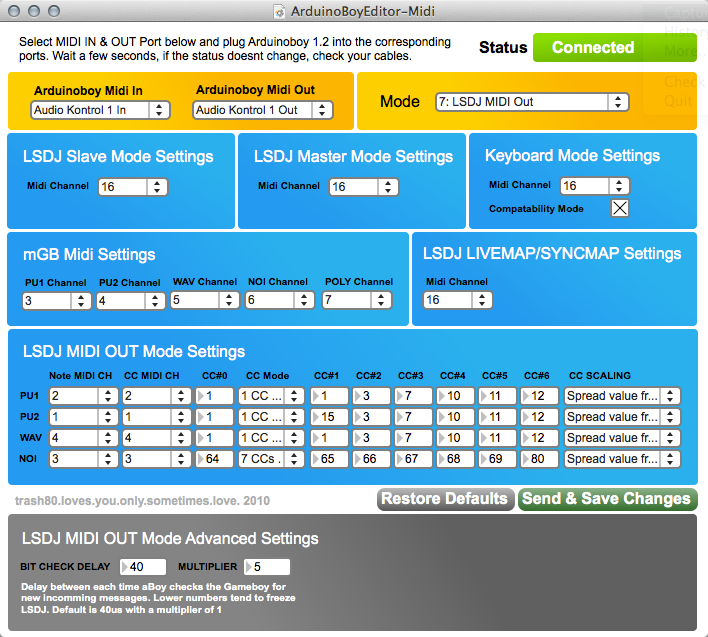
hey guys! i'm finding the lack of proper documentation of each mode and what it does and how to set it up and make it work very hard and confusing.....

I've just built my arduinoboy yesterday and it works with mGB flawlessly (however my midi output port on it needs a small rewiring, but that's not an issue since i dont need midi out for now)

i'd probably end up making a video (or series of videos) showing exactly each mode in action with explanations of how it gets set up and what channel and all of that... but right now i'm still trying to gather information to get a clear image, apart from mGB, everything seems very muddy and blurry.

I've tried to search on google for a while now for some more detailed explanations of other modes besides mGB but finding the results less than satisfying... does anyone know where i could find better explanations? if now, would you kind folk with arduinoboy experience care to share your knowledge.... id gladly take a day to shoot clear videos on each mode and will be forever grateful for your help smile

thanks!
and here's a lil jam i did this morning with my new (ghetto as fudge) arduinoboy:
https://www.youtube.com/watch?v=tON7VnGWs9w

Some of the topics id love to clarify:
>how come there are supposedly 7 modes as of the last update but there are only 6 LEDs? how are the LEDs reflecting the modes?
>each mode and it's corresponding LED number.
>how to set up and run LSDJ keyboard mode.
>what midi channel is each mode set to


i currently have an mGB cart running 1.3.3 (latest as of writing this) and an lsdj cart running 4.7.5 (which i'll be updating later today to 4.8.4 (which i believe is the latest version that i grabbed this morning from the lsdj repository)

thanks! and i hope i get some awesome feedback as usual big_smile

PS t's good to be back into the chip world. big_smile

Hey guys! sorry again, but i have one more question.... in the original trash80 schematic, there's just 3 wires from the arduino going to the gameboy cable (A0-A1-A2)... but in countless other demos and photos there's also a ground wire running from the GND on the arduino to the gameboy link cable as well....

My question is this:
Is the GND connection necessary for it to run? in my breadboard tests i had the ground wire connected... did not think of trying to remove it. the reason why i'm asking is because of the simplicity of connecting a 3 wire cable to the gameboy (using a simple 3.5mm jack) versus the complexity it is to do a 4 cable one (another DIN or a ps/2)...
i'm planning a trip to the electronics store tomorrow morning and i don't have time to rewire everything just to test that out.. if someone could have a quick answer that would be great thanks!

Charbot wrote:

in addition to V reg (wont need that tho' if you tap the GB's 5v) ,  you WILL need the crystal/ resonator circuit.  While, you could build it all point to point on a socket or something; Id suggest one of these:

Arduino pro mini.  All in one  postage stamp - sized  package  (well maybe 2 stamps)
http://www.ebay.com/itm/Pro-Mini-Enhanc … SwT6pV5YIu

So tiny-   and flat.   will be much easier to fit inside somewhere in the GB and will save you lots of wiring, debugging headache.

you can find them from US sellers for almost as cheap.   youll also need a ftdi to usb programmer.     Last time i ordered a bunch of Pro mini's, a programmer was included as a bonus.     like 18$ (shipped)  for 5 of them.            (you can also use a UNO to program in , but it is kinda a pain)

you know what? i think you're absolutely right...i've been avoiding these tiny ones just because if the lack of usb port, but i realize that i can set up one of my 2 arduino boards to program them like you said... and for the price there's no reason not to do that. definitely will save on some added part headaches like the crystals and caps and voltage regulator.. probably will cost me more to buy the parts separately than this and will take more space!

From now on i'll use the main UNO board for prototyping and i'll buy a bunch of these small pro minis for the final projects! big_smile

thanks for the advice big_smile

also... where do i get me one of those tiny screens?

nitro2k01 wrote:

Those pins are just being used as digital outputs, so no special care is needed. Connect AVcc directly to Vcc and leave AREF unconnected.

awesome! exactly what i wanted to hear big_smile thanks for confirming my hunch smile

Once i have it built i'll share it along as well....

I might do a build video too... (it's always fun to film stuff)

xspheric wrote:

We haven't been able to get in contact with everyone via PM. For anyone still able to help out with further testing - please drop me an email via my profile!

just emailed you buddy smile

FIRST: i'd like to say that this project looks great! i've inherited a coule of Segas from my cousins when they were cleaning out the house and since i'm the "8 bit guy" they automatically thought of me. perfect.

I ususally just used gameboys up o this point but ive been thinking of including a sega in my live setup.

i did some research and from my understanding the sega master system is more accessible for music DIY than the genesis?

Anyways i have a technical question about he sound chips... i was researching the sound chips on them and i understand that on the japanese model of the SMS there's the yamaha chip? YM... something something. (sorry i forget the numbers) but on the north american version it's an SN76489....

I opened up my master system and i could not find that chip.... in fact i couldn't find any chip that seemed like a ound chip. on little scale's blog he mentions in the prosound mod that the sn is inside of the sega 315-5146.... but the closest chip i could find on mine was 315-5216....tried to find some docs on it but couldn't find anything useful.

Tl;Dr... would this work on my sega? and why do i have different chips? on the inside it's marked as a sega M4 powerbase from 1987.
EDIT: Forgot to mention it's NTSC.... so if you're still looking for beta testers i'd be honored to give this a whirl! (i live in montreal, canada)

hey so i'm building a standalong board with the atmega 328 chip from an arduinoboard flashed with the arduinoboy sketch. trying to make a small as possible board (i could probably do a smaller one with a arduino micro or something but i only have the large atmega chips on hand)

Since i'm planning on using the chip off the board i was looking at its wiring and noticed something on the arduino website:

"Pin 21 - AREF - Analog reference pin for ADC
Pin 20 - AVcc - Suppply voltage for the ADC converter. Needs to be connected to power if ADC isn't being used and to power via a low-pass filter if it is (a low pass filter is a circuit that reduces noise from the power source. This example isn't using one)"

i know the arduinoboy uses the A0-1-2 pins as output to the gameboy. correct me if i'm wrong but that means that those pins behave as digital pins not analog am i right?

does that mean i can negate doing any AREF and AVcc low pass filtering like mentioned on the site? i can just use the barebones circuit (crystal + 2x22pico caps) (maybe the reset button as well... not even sure i need that)

i'll probably need to add a voltage regulatoras well... planning on using a 9V dc battery to power the circuit. it'll be in its standalone box (not integrated in the GB)

Here is a video i did of the test circuit wired with a breadboard (for fun)
https://www.youtube.com/watch?v=wNsFlE-srX0

61

(188 replies, posted in Trading Post)

yooo that looks amazing! i'm currently in the process to build one myself... i haven't even checked out the premade kits out there coz i find it part of the fun researching it and doing it yourself.

I love your design it looks awesome... although personally i prefer to negate the arduinoboard completely and just make a complete standalone using a single board (that's what im working on)

Perhaps i could design my own pcb layout with all integrated... i know they already exist as well...

also i have a question, is there any way i can get lsdj keyboard to play PU1 and 2 simultaneously? i want to play a phasing sound by detuning PU1 vs PU2. works great in normal composition mode. would love to figure out a way to get it to play with the keyboard.

tenshun wrote:

here me playing the gameboy like a mpc.
triggering the samples i loaded into it.

i use this when i play live for when im changeing programs on my mpc1000

http://shootyourfuckingheadoff.tumblr.c … 5141245383


sorry about the crappy filming. its hard to film with one hand and turn on and plug in the dmg!


that's pretty dope i have to admit! curious about those samples, would love to know more info on this.

yeah i agree with that! there isn't enough actual playing and too much proof of concept videos. i guess people find it easier to build something than to use it. i find myself a victim of that often!

I used to have one back when lsdj was in the early 4.x versions. but it was so incredibly unstable. i built myself a new one now and tested it and it seems to be a lot more solid so that's good.

I never really saw its potential other than novelty until i started expanding my live set to include stuff other than the GB, so right now i have a volca sample that i'll be experimenting with running along with the GB. initially i wanted to make me an arduinoboy and run mGB, but i'm a sucker for lsdj tables.
So i'm planning on playing melodies on the gameboy live and recording them using loopy HD on my ipad (only sampling/looping thing i have) while im jamming on the volca sample.
Id like to also get a TR-8 and volca bass for a complete setup and make the gameboy just a small part of a bigger setup rather than the sole focus.

I'll be experimenting with that setup soon (once i buy new batteries) and will be uploading some vids.