Offline
Austin, TX
kitsch wrote:

yep!  trying to catch up on some out of stock stuff this week

Awesome, I'll go ahead and order one of your kits to save the hassle of buying the caps individually.

I have some questions about some minor things that hopefully you guys could help with,
-I'd like some suggestions for cleaning supplies for the DMG case, I want it to look as nice as possible. The case also a few spots where dabs super glue were applied, mostly for mounting SMD LED's, but I decided to remove those LED's and now I'm trying to remove the fogged up parts of the shell. I have a Dremel with buffing tips, but should I use that or some other cleaning method?
-I feel like this is a dumb question, but could one of the more experienced modders give me the name and/or gauge of wire that they prefer to use? I typically use the same wire for all of my mods, just a 15 foot, 16 stranded wire ribbon cable from the electronics store, never really put much thought into that because those wires always worked well for me in the past so there wasn't a need for any other wire. The wires I have attached already will work fine, but there's still quite a few wires to add and I'm going to need something different.
-On the Prosound jacks, which wiring method would work best? I've used 2 different methods when modding. I either make a small pcb attached to the prosound solder points that all the audio jacks are also attached to, or I have the prosound solder points going to the 1/4", and the 1/4" also leads to the 1/8" jack, and the 1/8" then leads up to the RCA's. I've never had problems with either of those methods, but would one work better than the other?
-I'm trying to figure out how I'm going to get the Mega Memory Card in there, so I was thinking I would just build a custom PCB with the Mega Memory Card components (without the cart connector of course), instead of modifying the original PCB. I don't have any experience with removing CPU's from PCB's but I've read that they can be removed with a heat gun, has anyone tried that? I thought after I removed those, I would used a conductive ink pen to draw the traces on the custom pcb, and then cut it to fit in the DMG. Would that be more trouble than it's worth?
-I haven't ever made a DMG with an internal ArduinoBoy that also had the LTC Clock Control Mod, and I'm wondering if I need to have a cutoff for the LTC's power whenever the AB is powered on? If you had both on at the same time, wouldn't the DMG and/or LSDJ crash?

I really appreciate all the help everyone has provided me with, and thanks in advance for the future assistance!
Offline

Bump. This guy needs some help.

Last edited by DotAndDash (Oct 25, 2012 11:07 am)

Offline
Czech republic

About he MMC: I think it is way more trouble then it's worth.
Can't help with the rest much.

Offline

Oh? I havent got the first clue about modding, but why do you think it would be so difficult?

Offline
Austin, TX

I spoke with some people about the MMC, and the main problem seems to be finding a spot for the huge pcb, plus the routing of the cart slot pins through the MMC, and then to the cart connecter in the Transfer Pak. I'm going to find the pinout schematics for the MMC and see if/how I can fit it by possibly reconstructing the pcb. Currently waiting for a cap kit from Kitsch to arrive, should be here soon. Once I've got those I'll be able to really get back into this project.

Offline
Boddah wrote:

-I'm trying to figure out how I'm going to get the Mega Memory Card in there, so I was thinking I would just build a custom PCB with the Mega Memory Card components (without the cart connector of course), instead of modifying the original PCB. I don't have any experience with removing CPU's from PCB's but I've read that they can be removed with a heat gun, has anyone tried that? I thought after I removed those, I would used a conductive ink pen to draw the traces on the custom pcb, and then cut it to fit in the DMG. Would that be more trouble than it's worth?

I may be missing something here, but I don't see how this will work. How will you solder to conductive ink? Even with custom etching, hand drawing PCBs is insanely finicky and difficult. Especially with SMT stuff.

Can you post a picture of the original PCB? I've never seen one. Might be able to give some suggestions.

Offline
Austin, TX

http://i1196.photobucket.com/albums/aa4 … G_3834.jpg

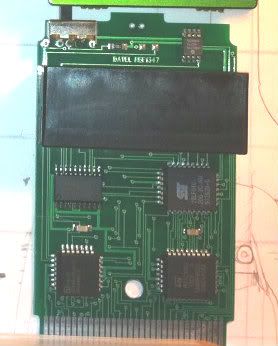
The MMC pcb is the one under the Transfer Pak pcb. As for connecting it to the cart slot, all of the leads going to the cartridge pins on the MMC, there are very tiny holes in each trace with a very tiny amount of exposed copper around them. I have some wire that will fit in the holes and although it would probably be very difficult, I figured I would just have those thin wires connected to the holes and extended from the pcb about an inch, then attach thicker wires so they'll fit in the cart slot holes better. I haven't really made it to the MMC yet, so once I get there I'll figure it out I guess.

Offline

You know, this is all over my head...

Offline
Austin, TX

Hey ApeShit, here's a better pic of the MMC pcb, if you could give me any pointers that would great!


Offline

If you deem the mod necessary, I suggest not using the arduinoboy kit that you're currently using and just fit the entire MMC PCB into the DMG. The arduinoboy circuit is very minimal and can be much smaller than that. Where as sizing down and reverse engineering the PCB could cost you weeks of work.

Offline
Austin, TX

Those are very good points, the last internal ArduinoBoy I did was built from scratch and I think that may be the best way to go with this one. The MMC is a major part of this project, so I feel I've got to find a way to get it in. I'll get to work on some new blueprints for that whole process. Thanks for the tips, Apeshit.

Offline
clovis CA

try 30 awg kynar wire =]
for prosounding, try thinking geometry. the shortest distance between 2 points is a line. so which ever point is closer to another point, snag it =]
for the arduinoboy and ltc oscillator, my theory is that the gameboy runs on something like 4.x MHz. the arduino runs on 16 with its own processor and crystal. so i don't think it would make it crash. test it and see what works =]

Offline
Austin, TX

Thank you so much Alley Beach! I really appreciate the wire suggestion. I see what you mean concerning the LTC and arduinoboy, I feel like it wouldn't do anything really if the midi clock was from an external source, but if the GB was set to master I think the midi signals may glitch. But like you said I'll just have to test it and find out smile

Offline
Czech republic

What's the point of the internal MMC? I must be missing something importatnt here...

Offline
Austin, TX

Hey Apeshit, Alley Beach, and any other experienced modders, do you guys have any suggestions for reconstructing the ArduinoBoy? I can't afford to buy another kit so I'll be recycling most of the parts from the MEOW kit, mainly the IC's, the diode, caps, and some resistors if I don't have spares. I'm about to start the rough draft blueprints, I'll get 'em up here asap.

Offline

If you're using the DIP chips, you could always just do a "dead bug" style circuit, or do it on a breadboard.

I put together a mockup of an internal arduinoboy board. This is an example of how small it can get. Using a different IC package and removing the programming headers, it could be even smaller.