Duck wrote:
I second this. I have Catskull's Teensyboy Pro and it's very well made. I highly recommend any of their products!
chipmusic.org is an online community in respect and relation to chip music, art and its parallels.
You are not logged in. Please login or register.
ChipMusic.org / Forums / Posts by Doctor Octoroc
I second this. I have Catskull's Teensyboy Pro and it's very well made. I highly recommend any of their products!
Thoroughly impressed with this! I haven't ventured outside of 4 and 5 channel chips but I use these techniques on single channels a lot. Crazy that you did all this with just the one monophonic square. What other parameters do you have access to for this? Duty cycle? Pitch? Anything else?
I've been working on a cover album of Neutral Milk Hotel's "In The Aeroplane Over The Sea" for about 6 months now. I'm just about finished the tracks and am currently securing the rights to release while getting feedback from friends. The reactions have been great so far (one friend gave it a standing ovation in my living room, haha). Here are the first two tracks (they blend together).
I also have been working on the album art. Here are the most recent version of the front and back cover:


Most people here will get the name "In The RP2A Over The Sea".
If you're not familiar with the original album, you can listen to the same first two tracks here:
I recently acquired a Teensyboy with mGB and am attempting to send MIDI control signals via my DAW (FL Studio). Thus far, I've set up all of the custom CC's found in the mGB documentation on GitHub and have been able to use them all with success.
However, I can't seem to draw in manual volume changes on the event editor. For MidiNES, this works nicely by drawing the changes in the event editor for the DAW's channel volume parameter (or the custom CC#7 master volume) but I can't find the appropriate CC or parameter for the DMG/mGB setup. Drawing on the channel volume control does nothing.
Anyone know how to do this or is it only possible to do limited volume changes via the volume envelope?
I've also tried changing the values of the volume envelope across the duration of notes to get something resembling manual volume control but any values I draw in only seem to effect the note's beginning parameters. Any help would be much appreciated, thanks!
PULSE CHANNEL COMPOSITION TECHNIQUES PART 1: VOLUME
For this section, I'll be focusing specifically on the MIDI CC's associated with the volume control of the two pulse channels and how to implement them for a variety of note styles. Now that we know how the controls effect the volume, we can apply them in various combinations to achieve desired results. How you assign each control to the channel will depend on your DAW but here is how it's done in FL Studio:
Adding Controls to the Event Editor in FL Studio
First off, look for this row of icons  and open the browser
  (by default, it'll open up on the left side of the workspace).
Expand the following menus: CURRENT PROJECT > GENERTORS > MIDI OUT > PULSE 01 (or whatever you named the channel you're editing, but for starters, we'll be editing events for Pulse 01). Once you expand the channel name, you'll see the names of all of the custom controls you created. Right-click any of these and you'll get a pop-up with the option to 'edit events in piano roll'. Upon selecting this, the bottom pane of the piano roll  window should expand and you'll see an empty grid where you'll be drawing all of your values. Alternatively, if the event editor is already expanded, you can drag and drop the control name into the event editor pane. It is within this pane that we will be assigning all of our control values and any values entered will apply to the notes directly above them in the piano roll portion of the piano roll window. The control values appear like a bar graph and any value entered will remain up to the end of the track until a different value is entered further in the timeline. They also lock to the same note segment divisions that the notes do so if you have 'step' selected, setting a value in the event editor will create a bar as wide as full step intervals. The grid in the event editor will also change as different lengths of step are selected (much like the grid in the piano roll does) so upon selecting 1/2 step, for example, the grid divisions will double. Selecting the correct step length will be important when drawing in the event editor because we want the contols to apply to the same intervals as the notes, or some evenly divided fraction thereof. It takes some getting used to drawing in the event editor but you'll get the hang of it.
Also, at any point after you've chosen a particular control from the browser to edit in the piano roll, you can access it again more quickly by right-clicking within the empty area to the left of the event editor grid (and below the piano graphic) and selecting that control from the pop-up menu. Alternatively, you can select it from a drop down menu in the title bar of the piano roll window. By default, this will have 'velocity' shown but it will always show the name of the control you are currently editing in the event editor. All previously added controls will be shown in either menu (pop-up or drop down) along with the channel they're associated with so after adding the 'duty cycle' control for pulse 01, for example, it will be listed as "Pulse 01 - Duty Cycle" in these menus and you can select them more quickly than going to the browser every time. You will also be able to select the channel volume, channel pitch, or note velocity via these menus at any time (they won't be in the generators list as they're not specific, custom CC signals).
If you're following along with this guide in your DAW and want to learn by doing, these are the values to apply to both pulse channels at this point:
- Channel Volume = 127
- Channel Pitch = 0 cents
- Duty Cycle (CC#1) = 64 (50%)
- Length Envelope (CC#9) = 127
- Loop Envelope = (CC#10) 127
- Volume Envelope (CC#11) = 127
These values create solid notes with full volume and sound like the leads in the 'Super Mario Bros.' and 'The Legend of Zelda' themes. These are also the values I apply at the start of just about every track I create as a standard and then I build upon them (or change them, but usually, I'm not certain how I'll be manipulating the parameters until I at least have a melody laid out).
Okay, onto the volume related techniques!
SOLID NOTES WITH A DELAY EFFECT
A common style of note you'll hear a lot in classic NES tracks is delay. Delay is essentially an 'echo' of the note that is commonly done in commercial tracks with effects generators. Of course, we don't have anything like that built into the NES, so we have to get creative. You could run your track through a delay filter during or after recording the track (or track parts) but it's not a 'pure' technique as it wouldn't be possible to create this with the original hardware alone. We're trying to utilize the hardware, not take the easy way out!
Delay Utilizing Both Pulse Channels
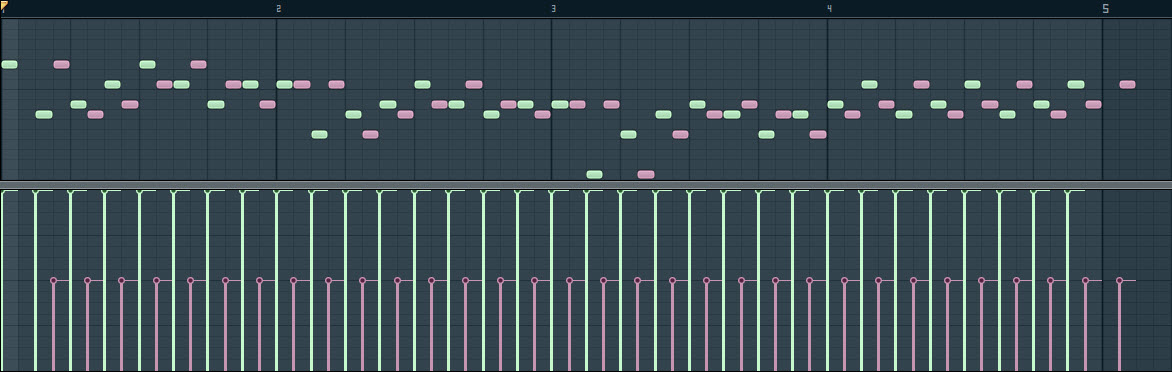
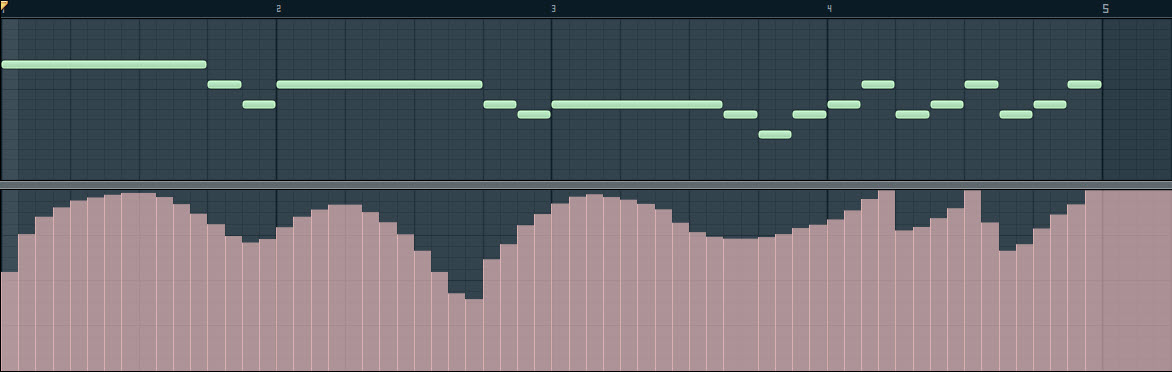
The easiest way to create a delay or echo effect is to lay down notes (at 100% note velocity) to create a part on one pulse channel, copy and paste them onto the other pulse channel, then move them forward in the track a small amount. Next, decrease the note velocity of all of these duplicate notes to the desired value. I usually go with about 50% velocity as that is still loud enough to hear with other parts in the track playing but quiet enough to not sound like the initial part is just repeating itself. Occasionally, I'll set it to 75% or 25% but anything below 25% is going to be too quiet and anything above 75% will be too loud to give a proper delay/echo effect. You can move the lower velocity notes on the second pulse channel around a bit to get the delay timing you want.
For this example, the green notes are at 100% velocity and the pink are at 50%. Top is pulse 01 and bottom is pulse 02.


You'll notice that compared to the following decay effects, this one makes the full velocity notes much louder due to the fact that the notes overlap. It's also important to point out that both pulse channels for this type of delay effect need to have the same duty cycle (CC#1) value or else it won't sound right as you'll have a different sound for the echo than for the full velocity sequence.
You can hear this type of delay effect used in the "Shadowgate" soundtrack. The one downside is that you have to occupy both pulse channels to achieve this.
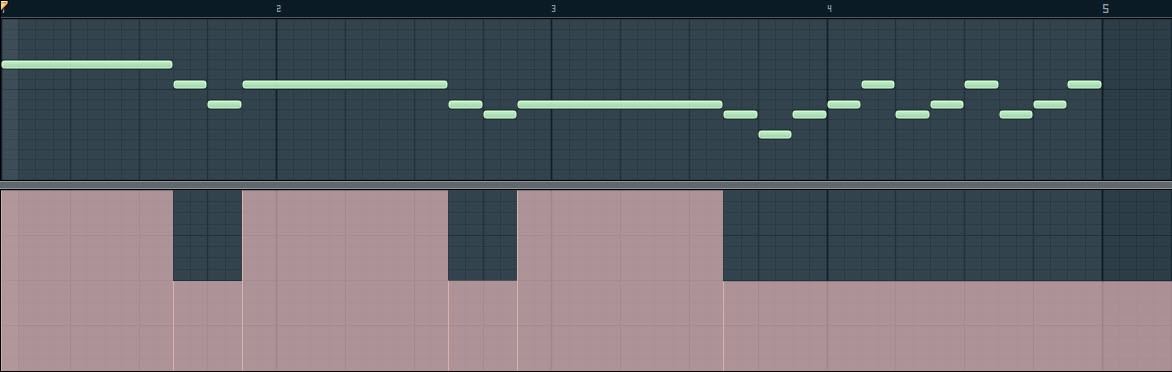
Delay On One Pulse Channel
While the effect won't be quite as effective in creating true delay, it is also possible to create a delay effect without utilizing both pulse channels, freeing up the second pulse channel for other parts. To do this, lay down the notes of your part but decrease the length of each note by a small amount by dragging the tail end back and shortening the note length. Then add a new note into the empty space after each note in the sequence (but ending before the beginning of the next note) that is at a lower note velocity (again, I usually go with 50%). This will play a short 'echo' of each note directly after it ends and give the impression of delay. Again, it's not as effective as using the second pulse channel as I detailed in the last few paragraphs, but it works nicely and with other channels playing along within the context of a full composition, the difference is less noticeable.

Feel free to experiment with the point at which the 100% velocity notes end and the lower velocity note portions begin and how long they continue. You can also add multiple notes after each full velocity note at varying descending velocities (eg 100% velocity note followed by three short notes with 75%, 50% and 25% velocities, respectively), with the last of those three ending before the next note begins. Doing it this way creates a smoother volume transition.
You can hear this type of delay in the lead part of this arrangement of "Bixby Canyon Bridge" by Death Cab For Cutie I created at 1:35 into the track.
Extended Delay Effects Using One Pulse Channel
For the previous delay examples, the delay effect was more subtle since the lower velocity notes followed closely after the full velocity notes and ended before the next note in the sequence in each instance, but on sequences with shorter notes that have some space between them, we can add lower velocity notes corresponding to their full velocity predecessors after later notes in the sequence so that the 'delay' is heard later on. This creates a longer delay time between the initial notes and their echoes.
For this and the next example, I changed up the tune so that instead of the longer note at the beginning of the first three measures, similar sets of the shorter notes in the fourth measure were inserted.
You can hear a version of this type of delay effect in this arrangement of "Another Life" by Kano that I created during the opening few measures. However, I also implemented a secondary technique in this track that I'll cover next, which divides each full velocity note in the sequence into two shorter ones and lowers the velocity of the second of that pair, then the corresponding delay note uses the same technique but the note velocities of the pair are significantly lower than those in the initial, full velocity pair.
Complex Extended Delay Effects With One Pulse Channel
As I just mentioned, you can divide each full velocity note in an extended delay sequence into two shorter ones, lower the velocity of the second, and do this for every note in the sequence. Prior to creating the delay note pairs, you can clearly hear how each note has a subtle delay on its own since we added the lower velocity notes directly following the full velocity notes (similar to the Delay On One Pulse Channel section above). Once you copy and paste the second pair for the echoes, reduce the velocity of all of them at once. If, for example, you have 100% and 50% for each initial note and reduced the velocity to 50% on all of the echo notes, they will have 50% and 25% velocity values respectively. This is my go-to for velocity values in this type of delay effect.
In this example, the additional blue notes are at 25% velocity.

Combining Delay Effects
Obviously, you can use any combination of the above to achieve various results. Perhaps longer notes have a simple delay while shorter notes use the 'complex extended delay' technique. The potential for delay on a single pulse channel or both adds a nice depth to any track that is sure to spruce it up!

SOLID NOTES WITH MANUALLY DRAWN DECAY
As described in the last section, you can do volume changes manually by drawing the values in the event editor (as it's known in FL Studio) or with the built in volume and loop envelopes. Here, I'll show you how to do it manually while working with otherwise solid notes.
As a point of interest, you could even use this technique instead of the delay effect techniques outlines above by manually drawing in the appropriate volume channel changes where the duplicate 'echo' notes would be. See the comparison of this to the 'Delay On One Pulse Channel' below.
So why would you want to do this instead of via note velocity?
The main advantage to this method is it will be much smoother sounding. Notes played on the pulse channels have what's called a 'note on' velocity. That is, if you play notes in succession, you'll hear the beginning of each note with a bit of 'punch' to it because the initial volume you hear when the note is first played is different from the volume you hear as the note continues to play. However, if you use the event editor to change the channel volume instead, that extra 'punch' won't be heard anywhere you change the volume over the course of a single note as it's only heard at the start of each note. This difference is more noticeable on shorter notes since hearing a punch near the end of a long note isn't as jarring as hearing that punch very soon after the first.
The downside is, you have to draw in the channel volume changes manually throughout your track if you can't copy and paste control values in your DAW, whereas you can always copy notes along with their associated values and paste them where you like to repeat parts. Manually drawing the values will mean a lot more work but a cleaner, smoother result.
Creating Decay on Solid Notes
Using the event editor to create decays can be time consuming but is necessary for notes that you want to fade out over the course of a longer duration than the volume envelope allows. The automatic decay on pulse channels can be set to anywhere between a fraction of a second and up to a little more than one second (these times aren't associated with the actual control values but consider that if value 127 would give you a decay time of a little over a second then a value of 64 will give you about a half second, and so on). This isn't a long period of time so if, for example, you want a long lingering note as part of a chord, or part of a lead that fades out slowely as other parts play to the end of a few measures, you would need to draw that in manually.
For the sake of this example, let's say we have a whole note that we want to fade out. At 160BPM, that whole note will last 1.8 seconds and using the volume envelope will have it ending more than a quarter measure before the note plays all the way through. But we want it to last for the entire measure so we have to draw the value in the event editor.
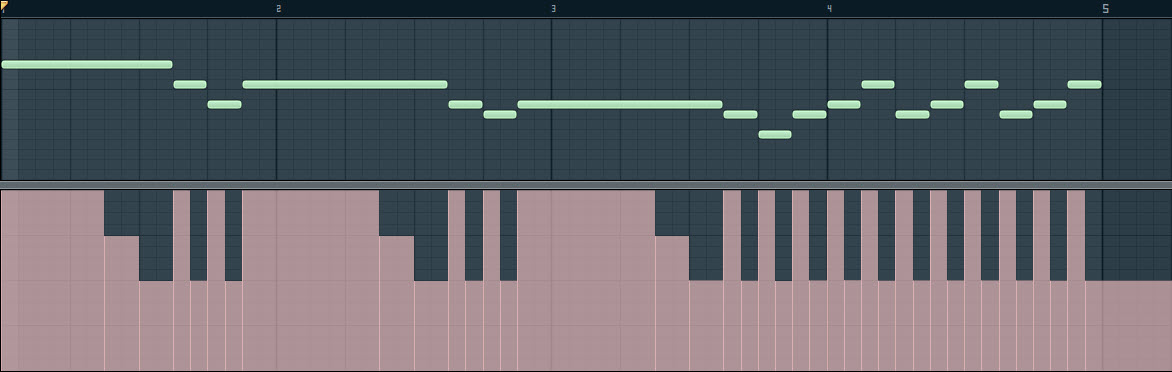
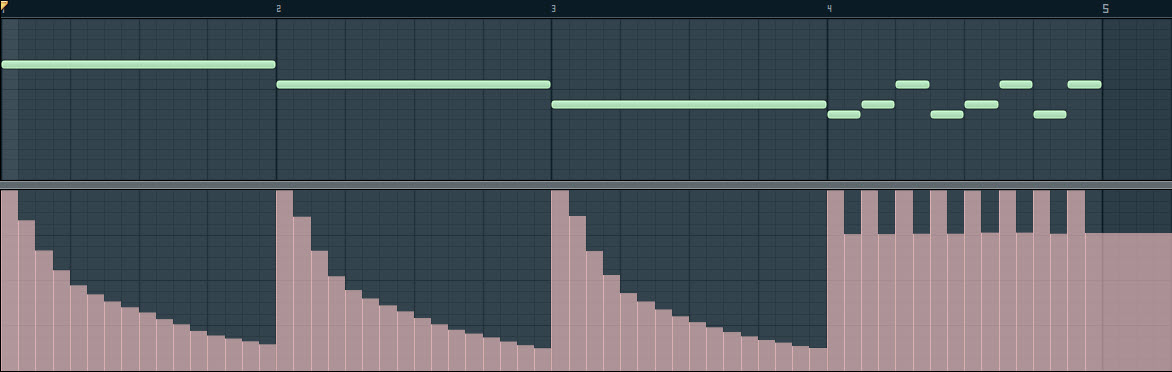
For these examples, I inserted a whole note into the first three measures.
If you want a linear decay (decay with a constant rate) then you should draw each step along the duration of the note at even intervals. This most closely mimics the way the volume envelope creates decay.

If you want a note that lasts a little longer then decays quickly near the end, draw a curve that is shallower at the beginning of the note and steeper near the end.

And likewise, of you want a quick decay at the beginning and the note to last longest at a lower volume, it should be a steeper progression of steps at the front end and shallower as it nears the end of the note.
Remember that you won't hear anything between values 0 and 7 so be sure to keep the last bar of any of these manually draw volume control points at 8 or above!
Notes With Attack Volume Adjustments
As you might have guessed, doing the reverse of the above will have the note start quieter and get louder towards the end. In the terminology, this is called attack. The quicker the note reaches full volume, the higher the 'attack' is. The slower it takes to reach full volume, the lower the attack.
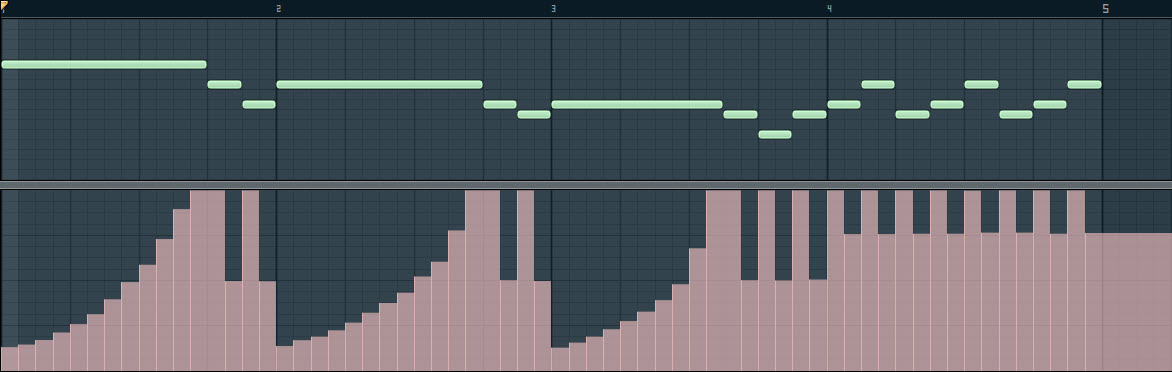
Organic Volume Changes
And now you can combine these drawing techniques to create more organic volume changes, which are great for leads and is closer to how someone would sing the lead. You can have notes swell to create more power coming into a new part or have them get louder across sections of the composition to build up to a chorus. I utilize this method a lot in slower tracks where the lead is heard mor prominently due to more subtle drums, longer bass notes and less going on with the backing part and it creates a nice, smooth, vocalized sound.
You can hear this type of organic volume change at 3:43 in my cover of "What Sarah Said" by Death Cab. In this part of the lead, I adjusted the values to sound both decayed and with lower attack.
NOTES WITH DECAY USING THE VOLUME/LOOP ENVELOPES & CHANNEL VOLUME
As I mentioned in a previous section of this guide, achieving decay using the volume envelope (CC#11) is quite easy. Simply set the value of this controller in the event editor anywhere below 64 at the start of the note or notes you wish to have decay, then set the loop envelope (CC#10) to anywhere below 64 as well. Again, setting both the volume and loop envelope at the same value will ensure that you don't get any repeating notes you don't want and is a good practice that I recommend. Next, set the channel volume to the value that you think gives the note the best decay time. If you're unsure about where to set it, try the max (127) first and see how it sounds. When you have longer notes in the sequence, this will be a good value to have while with shorter notes, you may want to decrease the value so they don't sound like solid notes. In a perfect world, the decay set by these parameters would have the note begin at 127 and end at 0 no matter how long the note is but the NES doesn't work that way so if you want the cleanest sound, adjusting the channel volume for each note depending on its duration will give you the most control.
For lead parts, I often start with the channel volume at 127 and adjust the values for much shorter notes that repeat at the same key next to each other. I do this so the note volume at the end is low enough that the next note is more prominent in comparison. I use this automatic decay in many tracks but this cover of "Crooked Teeth" is a great example as both pulse channels utilize the volume/loop envelope and channel volume to get a nice sounding lead and backing part that don't overpower the whole song.
Okay, here is the next topic:
UTILIZING THE MIDI CONTROL SIGNALS
For this next portion, we're going to focus on the specific MIDI CC signals being sent to MidiNES via each MIDI Out channel (as well as a few controls that are included with most DAW's). Luckily, the same set of CC's are used for both Pulse channels so you'll only need to familiarize yourself with the CC's of four channel types. Additionally, the Triangle and Noise channels only have five CC's between the two of them and unless you're doing some really funky stuff, you'll only require the use of a few of the DPCM channel CC's. Personally, I only ever use one of the CC's associated with the DPCM channel but I'll cover the other more commonly used controls since they have some good uses. I could write up a chapter's worth on the pulse channels alone but since this is a comprehensive guide, I'll save some of the real nitty gritty stuff for later when we get into composition.
USING THE MIDI CC'S FOR THE PULSE CHANNELS
One of the most used controls for the pulse channels in my own compositions, and one that is not available on the Triangle or DPCM channel, is the volume envelope (CC#11). In fact, the Triangle and DPCM have no volume control whatsoever. This is arguably the primary reason that many classic NES soundtracks use the Triangle as a bass most of the time (that and it has great low-end). But don't worry, there are composition techniques we'll cover later on that will give you options.
Volume Control
Basically, when it comes to controlling the volume of notes played on the NES sound chip, you have three options:
1) Note Velocity - this value is not one of the custom CC's we set up, but rather a standard control included in every piano roll/sequencer. This volume setting applies to each individual note and if you've ever recorded a MIDI composition from a keyboard or other external MIDI controller, you probably know that the harder you press the notes (if your device is touch sensitive) the louder this 'note on' velocity will be and likewise, the softer you press the key, the quieter it will be. When adding notes directly into the piano roll, this value is usually assigned via 'note properties' or other similar window/panel. In FL Studio, double-clicking any individual note will bring up the options for that note and these options include the volume/velocity of that note. This is the only stock control within these that we would be setting within the piano roll itself as most of the others don't have any effect on the MIDI CC's being sent to the NES. The note fine pitch control knob does change the pitch of the note but as this only changes the pitch of the entire note and cannot change the pitch over the duration of the note, we won't be using it at all.
2) Channel Volume - this value, much like note velocity, is not a custom CC. It is also a value that, depending on your DAW, is most likely not controlled within the piano roll but rather by an event editor, automation or some other similar method. What this likely entails is an expandable window within the piano roll area that allows you to manually draw volume changes, as well as values for every other control parameter (this will be crucial for controlling everything from the volume and pitch to duty cycle and other custom control parameters). In FL Studio, there is a draggable bar at the bottom of the piano roll window that can be moved upwards to expand the event editor (again, your DAW may refer to it as something else). The event editor is similar to the piano roll in the sense that from left-to-right determines the time in the track and from bottom to top pertains to the low-to-high values of the control. If you recall, we assigned all of the custom control knobs in each of the MIDI Out channel settings a value range between 0 and 127. This is the standard range used by MIDI and therefore the acceptable range for each control knob. However, each CC has a different range of its own and as a result, the division between steps of this range will equate to the standard 127 value range divided by this more specific value. As an example, volume control on the pulse and noise channels is limited to 16 steps, which means any value in the event editor set to between 0-7 will result in the same level of volume, 8-15 will result in the next step up, then 16-23, 24-31, and so on in increments of 8 with 127 being the max volume. As another exampe, the duty cycle parameter is restricted to 4 steps so there will be increments of 32 used for that control (but more on duty cycle to come). This manner of control is most useful for controlling volume levels on longer notes but can be used for shorter ones as well.
3) Volume Envelope (CC#11) - this custom CC is used to toggle an automatic decay for each note. Decay is how quickly the note transitions from 127 to a 0 volume value (or rather, from 16 to 0 as these are the steps available). This is extremely useful if you have relatively short notes (less than half or whole notes) and many of them, so you don't have to manually draw the volume changes for every note in the event editor, only draw a value to determine the rate of decay (more on that two paragraphs down). The volume envelope control only has an on or off value (two steps) so drawing a value between 0 and 63 will give the notes a decay while a value between 64 and 127 will result in a solid, continuous note. This control confused me a lot at first as when I set the value below 64, I was stuck with the default decay rate. This is because there are two other parameters we need to set in order to determine the nature of this decay.
The first parameter is the Loop Envelope - this is another on/off value that I habitually always assign to the same value as the volume envelope depending on whether I want notes with decay or solid, continuous notes. This is because the loop envelope determines if the note is played once through or if the decay rate returns to max volume after it reaches 0. It can be useful to have the loop envelope value at 64 or above while the volume envelope value is below 64 if you want a note that repeats itself over it's full duration at a set rate (more on setting that specific rate in the next paragraph) but you can also just place multiple notes on the piano roll, one after another, at specific intervals to get the same effect, hence the reason why I generally just set the loop envelope value to match the volume envelope value.
The second parameter used in conjunction with the volume envelope is the Channel Volume. We touched on this above when discussing manual volume changes set in the event editor but in this case, the value set will determine the decay time, not the start volume. In other words, the higher the value, the longer the note will hold before it eventually reaches a 0 value and the lower the value, the shorter that duration will be. While the channel volume has a standard 0-127 range, the intervals between changes are the same as the channel volume itself - in other words, you get 16 total steps of different decay duration. These times are also set by the clock on the chip, I believe, and are not based the tempo of the track, so what this means is that any notes longer than a certain duration (determined by the channel volume value) will fully decay (reach 0) before the track plays through to the end of the note segment in the piano roll. If the loop envelope value is set to below 64 then the note will simply not be heard after this 0 value is reached. If the loop is, however, set to 64 or above then the note volume value will be set back to max and repeat the same decay duration and continue to do this until the note segment ends. Depending on your track tempo, and since the tempo does not change the note decay duration, this rate of repetition may or may not be in synch with the track's time signature. Since it's difficult to coordinate the decay value with the BPM (Beats Per Minute) of a track and given that you're limited to 16 steps in duration, I rarely use this 'offset' combination of loop and volume envelope values. In fact I only have ever used it in one track and I got lucky that by having the track at 75 BPM and the channel volume value set at 64, the note repeated exactly every 3/16 note which, while not in time with the quarter or eighth notes, sounded nice. You can hear this part of the song here at about 2:33 into the track. Starting at that time in the song will play through the same repeating measure once without the loop enabled and again with it so you can hear the difference (on the higher of the low-end notes).
In summary, volume can be controlled multiple ways depending on how you want it to sound or what level of ease you want to be available.
For long, continuous notes, the volume and loop envelope values should both be set to 64 or above and you can either set the single note velocity or overall channel volume to the desired value. I usually set the channel volume to max and adjust the note velocities for segments of the track with solid notes.
For notes with decay you can either draw the volume changes in manually, which is necessary for notes too long for the preset decay values (and useful for less linear decays, volume 'fade in', or more organic volume changes) or you can set the volume and loop envelope values to below 64 and adjust the note velocity or channel volume to achieve the desired decay rate. I rarely use the single note velocity for this and prefer to adjust the channel volume values in the event editor so that I can see all volume changes in the track along the same control timeline.
A few things to note before we move on.
When the volume and loop envelope values are below 64 (for automatically decaying notes), the initial value of the volume of the note will always be max. It's only the decay rate that changes with channel volume or note velocity values. For this reason, I also generally have other solid notes at or close to full volume so those that utilize the volume/loop envelopes don't overpower the rest.
When drawing volume changes manually in the event editor, any value below 8 will produce no sound (this applies to note velocity as well). Conveniently, FL Studio has the event editor on a grid divided into 16 rows so I know not to draw any volume changes within the bottom of these rows.
You can also edit individual note velocities in the event editor. In FL Studio, these are thin, vertical bars, the top of which represent the value. This is useful for setting the individual note velocities of a group of notes at once or seeing them in relation to one another across portions of the track. This is most useful when creating noise channel drum lines, but more on that later.
Pitch Bend
Pitch control is one of the coolest things to play with but to be perfectly honest, it's also very time consuming. Your composition may not require any pitch bends whatsoever but it adds so much depth and character to a track (especially leads) that it's well worth the time you'll put in.
Where many DAW's give you automated ways to control pitch, doing so with MidiNES requires manually drawing all changes that don't adhere to set bend times (the next paragraph touches on this a bit). At least that's how it works in FL Studio. Now, your DAW may allow you more flexibility concerning this (FL Studio gives no way to control channel pitch in the piano roll but rather this is done via the event editor), and perhaps there is a way in your program of choice to not only more easily apply channel pitch (and channel volume) changes to the individual notes, but also allow you to copy and paste these changes as you would with the notes themselves. However, FL Studio and many other programs do not afford you this luxury within the piano roll composition. Although you can't copy and paste event editor data in FL Studio (again, maybe your DAW enables you to do so), much later I'll touch on my approach which makes the process a bit simpler than you might think so it won't be as much of a hassle to draw pitch bends or volume changes the same way for repeated segments (eg a chorus that you want to sound the same every time it comes up). Of course, if you're using a sequencer like FL Studio, you can always separate your track into multiple patterns and have any repeating parts simply reused that way, but for other reasons, I personally prefer to have all of one track in the same pattern so transitions between parts of the track are easier to control if they don't have clean 'breaks' between them (eg no overlapping channel volume or pitch changes).
When it comes to simpler or more consistent pitch bends, the CC's that include 'Sweep' in their names operate similarly to how the volume and loop envelope CC's can be used in conjunction with channel volume to control the decay rate of notes. Except that for pitch bends, there are more CC's to manipulate. I'm not going to go into these parameters (even though we did set them up on our MIDI Out) because drawing in values on multiple CC's can become time consuming and confusing, and I prefer to manually draw in pitch values directly to the channel pitch (not a CC) within the event editor. In fact, I don't even use the fine pitch (CC#8) as controlling that is still more time consuming (albeit not as limited) than doing it all by channel pitch changes. Essentially, I sacrifice a bit of capability for ease of use. You may be willing to put in the time to learn how to manipulate the fine pitch but for me, channel pitch alone is sufficient for all pitch related events. I won't go into it much here because I'll cover it later on but suffice to say that chiptunes have a lot of creative ways to fool your ear into sounding like something more complicated is happening when a simpler solution has been implemented.
In other words, you can use one parameter (channel pitch) to control vibrato, bends, etc. and have a more control over them in many cases, or you can attempt to adjust the values of four different controls (CC#13-16) for pitch bends and use yet another control (Fine Pitch, CC#8) to create vibrato. Again, you may prefer fine pitch to channel pitch but as they operate similarly, I'm only covering channel pitch.
Simply put, drawing changes for channel pitch into the event editor will allow you to raise or lower the pitch of the notes by varying steps. Straight forward, right?
The two main uses for this are pitch bends (perhaps from one note to the next to simulate portamento, or note slide) and vibrato. Vibrato is essentially a series of quick transitions between pitches on the same note to offer a 'trembling' quality that many vocalists have when they sing. Generally, I create these vibratos by drawing the value one cent (cents are how pitch steps are measured) above and below the center line, intermittently, at the desired duration. I tend to use 1/2 steps in most tracks as this seems to be a good balance between a good sound and not too much work (consider that drawing them at 1/4 steps would take twice as long). Sometimes I'll increase these values to 2 or 3 cents for greater change over time while other times I'll space them out with centerline (no pitch change, 0 cent) values separating them for slower vibratos. I'll also draw a transition from a few cents below to a few cents above and back down, repeating, to accomplish smoother, longer vibrato. This can also be useful for creating a detuning effect, to sound more like an electric guitar, for example. Basically, the higher above and below the centerline you place your values, the more 'wild' the bends will be and the closer together you place them, the faster they'll be. I'll touch more on different styles of vibrato later as well as transitioning between them over the course of a single, longer note.
Duty Cycle
This defines the way each pulse channel will sound and if you're familiar with Gameboy parameters or general analog sound generation, you may also have heard it referred to as "pulse width". This value has four steps (12.5%, 25%, 50% and 75%) and changes the 'quality' of the pulse sound.
- At 12.5%, the pulse will sound sort of like a stringed instrument (like a steel stringed guitar if there is decay on the note) at higher frequencies and a slap bass at lower frequencies. It's a rougher, 'dirtier' sound that has a ton of uses and I rarely compose a track without using this specific value multiple times over the course of the composition.
- At 25%, the pulse will sound a bit smoother and fuller, sort of like a trumpet if the note is held or an electric guitar if played with decay (and some channel pitch changes to give a detuned effect).
- At 50%, the pulse will sound very familiar as this creates a sound that most closely resembles the classic 8-bit video game sound of the lead part in the Super Mario Bros. and The Legend of Zelda theme songs. It has a very full, clean sounds great for leads at higher frequencies and something resembling a Moog bass at lower frequencies.
- At 75%, the pulse is very similar to the 25% value but sounds a bit fuller and has a tad more 'punch' to it. These are similar because they are created by the same waveform only reversed.
Basically you get your choice of 4 'instruments' (arguably 3 if you don't hear much difference between the 25% and 75% values) from each pulse channel. This allows for a number of combinations and as a general rule, I usually don't set both pulse channels to the same duty cycle value because having the same 'instrument' play two parts isn't as interesting as having two different 'instruments' play two different parts! Of course there are great applications for all combinations but more on that when we discuss composition techniques!
Length Envelope
This is a parameter (CC#9) that I don't use because all it basically does is shorten the duration of the note being played which is something you can determine when you draw notes on the piano roll. Unless you're in the unfortunate circumstance of working with a sequencer that doesn't give you control over the length of notes via the built in interface, you won't need this. I do, however, set this parameter to the max (127) on both pulse channels for every track I create to ensure that the note length is never shorter than what I draw on the piano roll. This is the default for MidiNES so it's not necessary - it's just a habit I got into in case I ever do decide to use the length envelope parameter for any reason in the future and don't want it to be set to a different value if I switch between working on different tracks. Of course, it's easy enough to reset the NES and all default parameters will be applied, but it's just a good practice for me.
Okay, that should do it for the pulse channels! Onto the others. These portions will be significantly shorter...
As I said before, I'm not going to go into parameters that I almost never use. Feel free to explore them for yourself if you're creating more 'experimental' music but for most compositions, they're not crucial.
USING THE MIDI CC'S FOR THE TRIANGLE CHANNEL
As mentioned earlier, the triangle channel has no volume control which means no CC's for volume, loop, etc. It also doesn't have any duty cycle or pulse width as it always generates the same tone.
It does, however, have pitch control which is identical to the pulse pitch control using either fine pitch (CC#8) or channel pitch in your DAW. As such, I also prefer to use the channel pitch but fine pitch is a greater consideration for this channel as the pitch steps are further apart so if you want more subtle vibrato or smoother pitch bends, you may want to look into using this instead.
As an additional note for both the triangle and pulse channels, pitch steps get further apart with higher frequencies. In other words, if you change the pitch to +1 cent on a high note, it will jump further than the same +1 cent step on a lower note. For this reason, when controlling pitch via either fine pitch or channel pitch, be more conservative with high notes and more liberal with lower notes. In my experience, I need to change the value on lower notes 3 or 4 cents before the difference is noticeable while on higher notes, I tend to space out lower values to avoid sounding too 'shaky'.
USING THE MIDI CC'S FOR THE NOISE CHANNEL
This is a rare case where I never use the custom MIDI controls. If you do decide to utilize them, they operate similarly to the same ones detailed in the pulse channel uses above. Volume, loop and length envelopes are available but the noise channel is unique in the sense that there is little to no difference in the sound of a single long note and a series of short notes placed one after another. This affords us the ability to change the volume of the noise channel without manual drawing in the event editor. That is to say, if you place 16 short notes in a row at descending note velocity values, it will sound almost exactly the same as a single note occupying the same duration with a manual volume change drawn in the event editor at 16 equal, descending steps across the duration of the note. Also, since I can copy/paste notes (and associated values) but not event editor data in FL Studio, I always construct my noise channel tracks from groups of short 1/4 or 1/8 step notes that change in single note velocity across the duration of what I construct as separate 'instruments'. This is much easier and far quicker than drawing in the event editor for every single note, plus it affords us unique possibilities for giving the illusion of mutliple drum-like sounds overlapping! More on that later...
USING THE MIDI CC'S FOR THE DPCM CHANNEL
The only control I use for DPCM currently is the Bank Switch (CC#14). This simply switches between the sample sets loaded onto the MidiNES cart. Each bank has 128 samples for a total of 256 (mostly) unique percussion-based sounds to choose from. Although a good variety of samples are included, if you search around the Internet, there may be available documentation for how to load custom samples with additional hardware/software. I'm more musician than modder so I haven't explored this option much. Also, since I tend to use the noise and DCPM in tandem for drums (and often times will use only the noise channel), I don't use as many different DPCM samples as I might if I was utilizing the DPCM alone, and I don't really consider using the pitch (CC#3) since the variety of available preloaded instruments include toms and other drum sounds at varying pitches already. I also usually stick with the default bank as it has more basic percussion samples but you can switch between them with a value below 64 for one and 64 or above for the other.
An additional note to close out this portion of the tutorial:
The parameters I've covered here reflect only a portion of the potential for MidiNES and I realize that. However, in an effort to keep the focus on composition and in the spirit of overcoming limitations and pushing envelopes, I've only really covered those which I consider to be absolutely essential for creating creative but more 'standard' compositions. Why else would we be making music with some of the most basic hardware available if we didn't love the challenge!?
I been real into my MidiNES lately and uhhhh how does the wave traveler function work
This is a topic I unfortunately won't be covering as it's not related to more standard composition techniques. I put this more in the realm of 'glitching' than anything else because it's essentially manipulating the playback of the samples as opposed to operating the musical tones. Thankfully, 2Player has some good experience with this and has it covered!
I'll be posting the next section of my tutorial shortly, covering the basic operation of all of the CC's that I personally utilize.
Doctor Octoroc wrote:Still, considering the lack of extensive documentation for MidiNES (hell, the video example used in the listing is from 2012), I've gotten the impression that a lot of people who got it back in the day gave up trying to figure out all the ins and outs and either sold it or it's collecting dust. I'm hoping this tutorial series can attract a lot of those people who already have it and haven't been able to use it to it's full potential!
Plenty of people just got tired of stability issues (especially for live use) & sold ours off on ebay. It seems likely the 3 carts i had are all collecting dust on shelves of people who don't use them. I decided I'd rather use mGB, though i miss the NES noise channel.
I'm sure there would be more vids and documentation, but lots of people who used midiNES heavily back in the day also weren't the sort who use tutorials themselves. Or remembered how the sabrepulse lsdj tutorials resulted in way too much lsdj stuff sounding similar for a long time & preferred that not happen with midiNES too
I'm sure the 'behind the scenes' stuff related to the creator also soured some opinions of the cart.
I'll grant it has some issues for live playback (although personally, since I mainly do studio work, I've only ever had to re-record a track on one or two occasions due to stuck or skipped notes so long as it's in mode 1) but I can't imagine that too large a percentage of the people who bought it were booking/playing shows and encountering issues that dissuaded them from using it at all. Given, anyone overly active in the chip-tune community back when MidiNES was initially released would likely be the type to not require a tutorial to learn the ropes as they were all experimenting on their own and sharing tips/tricks (I had to hit up 8BW for some myself) but I think that a much larger percentage made up people who had little or no knowledge of home-brew/mods and some that likely only knew the basics of composition, all who had a more casual interest in making chip-tunes and saw what they perceived to be a quick, easy way to create them authentically - at least quicker and easier than step sequencers and more intuitive for those who had some experience with MIDI composition software throughout the 80's and 90's like me. I used the crap out of Cakewalk in my teens!
But then they received it, tried to utilize it and found little to no support for the device (certainly none from the creator himself after a certain point). That would certainly cause many people, if not a good majority of them, who had spent the $100 for what they thought would be a simpler plug-n-play style device, to halt any efforts to uncover the 'mysteries' on their own.
Me personally, I don't know jack about home brew, modding, electronics, soldering, etc. I understand the terminology and can discuss the finer points but don't ask me to swap out a capacitor or add a back light to my DMG. I've supported those that can do these things with my hard earned money and put my own time and energy into that which I can do, and that's music performance, composition and arrangements. I did mess around with an Arduino for a week but it wasn't something I was about to pour years into in order to use it to the full potential. This is probably how many people felt about MidiNES after trying to figure out how all the features worked. But I decided to keep up with it over the years and gradually learned many of the features and that's why I started this thread, because I still see plenty of interest in chip-tunes and many people are using plug-ins that they probably wish were the real deal. Don't get me wrong, my first album was created with Tweakbench plug-ins, they're great for anyone without the means to use the original hardware but at some point, I wanted to use the actual NES and so I taught myself. But some people just require a bit of guidance and I don't see anything wrong with that.
I can understand the concern for similar sounding chip-tune tracks but, I mean, they're chip-tunes...made with the same limited hardware...there are only so many ways to utilize it on its own and I honestly think it's more a matter of over-saturation than lack of creativity because everyone watched the same tutorials. Maybe a bunch of people did just copy phrases and instrument parameters from sabrepulse tutorials but how is that any different from any other genre of music in that respect? You have a hot mess of noobs and amateurs playing the same tired thing, copying what they've heard, trying to get noticed, etc. Then you have a few who set themselves apart with some manner of unique style. It happened with '8-bit art' as well when everyone who downloaded Gimp thought they were a pixel artist and clogged up sites like Pixeljoint with sprite recolors and other garbage. A few artists were fantastic and the rest were not - that's just how every area of creativity evolves over time.
Nice cover and great use of the visualizer! I'll send some stuff your way later tonight.
I was drawing the CC data in the event editor for a while but swapped over to use a layer, envelope controller and midi out. It made instrument creation more streamlined for me but there are still areas that I need to use the event editor for. It is easy to create issues with data output this way though if you send a lot of CC messages using a smooth curve instead of a stepped function (learned the hard way).
Yeah, I learned that the hard way as well drawing data with the brush instead of in step with the time signature. A good rule of thumb I've developed is to sequence it as close to a 'program' as possible. I general manipulate volume in 1/2 or whole step intervals since anything less won't really be noticeable with only 16 volume steps, and I use manual fades as often as possible because I see more note drops when utilizing automatic volume decay. I also hadn't been using the loop envelope before and that solved a lot of issues with funky notes (leaving it on for notes with decay and hearing a brief repetition before the very end of the note duration).
But these are also the sorts of things I'll cover in time.
Doctor Octoroc wrote:
<3<3<3<3<3<3<3<3<3<3<3<3<3<3<3<3<3<3<3<3<3<3<3<3v
Thank you kindly!
Useful for the ultra-rich in 2019
I dunno, this one might not go too high:
https://www.ebay.com/itm/MIDINES-MIDI-N … SwwqVcO7If
Of course posting the link here might add a few more bidders to the mix...but $100 was honestly a steal for this thing. I know there are other options out there and emulation is pretty good but considering people spend hundreds or thousands on other synths, a few hundred still isn't too bad if you're willing to make the investment. As a 'fool around and have some fun' thing, it's pricey, but for anyone serious about making quality, authentic chiptunes using the NES, it's worth that much in my opinion.
Still, considering the lack of extensive documentation for MidiNES (hell, the video example used in the listing is from 2012), I've gotten the impression that a lot of people who got it back in the day gave up trying to figure out all the ins and outs and either sold it or it's collecting dust. I'm hoping this tutorial series can attract a lot of those people who already have it and haven't been able to use it to it's full potential!
Thanks! If you're interested, I can send you the DPCM effects preset for it or the song itself. I don't play live but would still be interested in cutting down on unpredictable behavior.
I am still curious about CC02 and CC13 for PCM modulation as well. I have tried to feed CC02 samples/waveforms but I can't get a high enough resolution in an effects preset to get a clear/coherent playback. Know of anyone who has done this?
I don't really play live either but I want the option to do so with any of my tracks without all hell braking loose haha. I had one DJ gig at a video game art show awhile back and I often play new tracks for friends but that's the extent of it.
That would be cool, thanks! I honestly stick to more traditional composition and arrangement and haven't delved into the experimental side of MidiNES as much. I use lots of creative techniques to accommodate fuller sounding tracks but not to do crazy stuff with the modulation. I manually draw all CC control data in the event editor and opt to create arpeggiator effects in the piano roll with placed notes. It's probably more time consuming than utilizing the additional CC's but it allows a bit more precise control and affords me the ability to play through a MIDItrail visualizer when I play the tracks for others so they can see the notes play in real time. I also use the visualizer for YouTube uploads like this arrangement of Neutral Milk Hotel's "Holland 1945".
Yes, I also haven't come across much out there. Most of what I have done has been through trial & error and experimenting. I have been using CC09 - CC12 to get some pretty killer bass frequencies but I have some issues with detuning when other channels are played along side it. I've also used CC05-CC08 in combination with CC03 to try to create custom speech but that's been more labor intensive than it's worth. Here's a track I did using only the DPCM channel for reference.
I am probably most interested in your instrument creation and process to see if there are things I can pick up that I haven't tried. Like how you set up your CC automation, lessons learned, sharing patches, etc.
That track is dope AF! Sounds like something Deadmau5 or Chemical Brothers would have put out. Yeah, my overall methods generally avoid any 'unpredictable' behavior that might kill a live play through. It took me a long time to finally get used to using the volume and loop envelopes in tandem with the channel/note volume to get the desired decay on notes - trying to figure out all the Wav Traveler parameters would probably drive me insane! But I would be most interested to learn a thing or two from your experiences!
Great introductory write up! I look forward to reading more of your posts since I have been using the same setup (midiNes/FLStudio) for a long time as well. I have a couple setups I use with the DPCM beyond the normal drum kit too if you are looking to create a wiki or comprehensive midiNes/FL guide
That would be great - I've found next to no documentation on implementing the CC#2 and 5-13 of the DPCM. I've played around with them but I couldn't quite get my 'bearings' enough to make use of them in compositions.
I guess as long as I have a known audience, I'll ask - what particular topics are you most interested in exploring? Are you more interested in the technical aspects or those related to 'achieving certain results' in terms of composition? I'm certainly no expert on the topic but nearly a decade of working with something will give a good level of insight!
Just listened to the three tracks from plans, and they're really cool! Loved your version of What Sarah Said! I liked the 8 Bit Jesus stuff too!
Thanks! Regrettably, I had not yet received MidiNES when I finished the 8-Bit Jesus album so it was made using Tweakbench plug-ins (Triforce, Peach and Toad), but they did such a great job with them and I still made sure to adhere to the limitations of the system. I've actually been wanting to redo all of the tracks with the proper hardware but new projects are always keeping me busy and considering I still have half of the press of digipacks I ordered when it released, I don't need to give people less of a reason to buy the original album haha.
Crooked Teeth is my personal favorite and funny enough, The Photo Album used to be my favorite but after working on these tracks for so long and listening to the albums so much, Plans may be in that top spot now. What Sarah Said is such a powerful song (even in lo-fi I tear up a little in the second verse because I know the lyrics).
Over the past eight years that I've been using MidiNES to make chiptunes, I've occasionally searched for tutorials and documentation detailing the specific use of all of the parameters but have only ever found demos and the original manual which simply outlines the CC signal designation and contains, at best, a brief explanation of their implementation. What all of the resources seemed to lack was a comprehensive explanation of how these parameters can be used in conjunction with one another and how this can translate into creating better sounds and maximizing the limitations of the sound chip. I've been considering writing a tutorial of sorts for years but just never got around to it until now.
What I'm hoping is to post in this thread regularly with each 'entry' highlighting a different topic. For example, some will cover technical aspects such as how to set up a MidiNES compatible file in your DAW, programming all of the CC's, which of those CC's to implement for different styles of note, etc., while others will cover topics related to composition and how to achieve certain results with the available parameters, and so on. I'm hoping for some decent responses so the time isn't wasted but I'll play it by ear. As long as people are interested, I'll continue adding to the guide! I'm not too concerned about having others post between my own since mine will be quite long in comparison so anyone who's browsing will be able to find them easily. Plus, I'll try to answer questions that pop up which will add to the overall usefulness of this thread as a comprehensive guide. If this continues on for long enough, I'll probably just end up transferring all of the text to a guide on my own website but for now, this is a good place to begin.
For starters, I'm going to focus on the bare bones basics for complete beginners - if you have a MidiNES cart, a NES, USB MIDI interface and a DAW (Digital Audio Workstation) that can send programmable MIDI control signals, the following will show you how to set everything up to get started. I realize most people with a MidiNES cart in their possession may already know the basics but it's better to explain too much than not enough!
Personally, I use FL Studio, so that will be in all examples but I'll try to use terminology universal to all DAWs and go into more detail to cover alternative methods when there may be differences between them.
Here is a brief description of my setup for reference:
- MidiNES with prosound modded NES (two 1/4" audio out jacks)
- Tascam US-122mkII midi interface to connect the MidiNES (via output cable) to my computer (via USB)
- Alesis USB Multimix8 (optional, but preferable to a direct line from the NES to speakers)
- M-Audio AV30 Speakers (not the best but sufficient for this)
- FL Studio 11 Producer Edition
Hooking Everything Up
Firstly, be sure your NES is fully functional, the MidiNES cart is inserted and secure, and the system powers on to the MidiNES title screen properly. If you're like me and you don't have a display hooked up to the NES, you can turn the volume on your mixer/speakers up a bit higher than you would to listen to music at a comfortable volume and listen in - whether you have a prosound modded NES or are working from the stock system, there will be some degree of hum. If it's consistent, then press the select button on the controller. This is a MidiNES feature which disables the visuals and trades the more noticeable hum for a subtle, solid, high pitched frequency. Pressing select again should return to the hum. If all these results are as expected, you have a good connection between the cart and 72-pin connector in the system and I recommend never removing the cart. This is your dedicated MidiNES system now!
Next, connect the MIDI out cable coming from the MidiNES cart to the MIDI OUT on your MIDI interface. You can also connect the USB cable from the interface to your computer now but I've found it can be finicky depending on what interface you're using. My previous Tascam US-122L interface almost always needed to be plugged in after I started up FL Studio (otherwise the program would freeze) but the US-122mkII has been much more reliable and FL Studio only freezes once in awhile (in which case I would unplug the USB, force close FL Studio then reopen the program before plugging the USB in again). I honestly don't know the underlying cause of this issue but that's been my fix thus far.
NOTE: Depending on what interface you're using, there may be a latency setting. Latency determines how quickly the MIDI data is sent to the interface (and therefore how close to 'real time' the NES responds to them), so the lower the latency, the better. For mine, it's an option within the software that installed with the driver for the interface but you may have a plug and play device with no associated software in which case the latency may be controlled via a knob or switch on the device itself. Regardless, latency isn't much of an issue if you aren't using additional synths that need to keep time with each other.
Now, open up your DAW and find the MIDI settings. In the settings options, there should be a list of MIDI INPUT and MIDI OUTPUT devices. The OUTPUT is what is important to us here. Plug in your device if it isn't already plugged in. If you don't see your specific interface listed in the outputs, there may be a 'refresh list' or 'rescan devices' button somewhere that will look for it. Once it pops up, select it and locate the 'PORT' option. I have this set to 1 but it really doesn't matter exactly what you set it to. What's important is that you use the same port number you select here later on when setting up the five MIDI output channels.
At this point, your DAW should recognize the interface and be able to send MIDI CC's to the MidiNES cart to make sound on the NES. You may have to enable MIDI output from another location but worry about that if it's not working later on. We'll set up the five channels now but you can test it after setting up the first.
Creating MIDI Out Channels
Okay, we're getting there! The next step is basically knowing how to do a few things then repeating the process a number of times. For reference, these are the five channels we'll be creating:
1) Pulse 01
2) Pulse 02
3) Triangle
4) Noise
5) DPCM
Let's create the Pulse 01 channel.
Add a MIDI Out channel to the instruments/voices/channels, wherever they may be located. This is done in a wide variety of ways in different DAWs so you may have to familiarize yourself with the specifics first. If you're working in a MIDI specific program (as opposed to a sequencing or pattern based sampling program like FL Studio), it will probably be easier to find and may be readily visible in the default interface layout. In FL Studio, there is a panel called 'Step Sequencer' which contains channels and a channel is added by going to CHANNEL>ADD ONE>MIDI OUT. You can name it whatever you like but for the sake of consistency and accuracy, I name it "Pulse 01". Upon adding it in FL Studio, the options for the newly created channel are opened (alternatively, clicking on the channel label does the same). Within these settings, you'll be looking for a few things:
CHANNEL - this determines which of the five available channels on the NES will be controlled by this MIDI Out. Set this to '1' (and the rest to 2-5).
PORT - set this (as well as every other channel) to the same number as you set in the MIDI settings. As I have my port set to '1', I've also set all of the channel ports to the same.
After setting these two parameters, open up the piano roll and lay a note or two down to see if you're getting sound from the NES. Be sure to add a note somewhere above A#2 as that is the lowest note the pulse channels can play. Assuming the results are as expected, continue! If not, then trouble shoot the connections, double check the MIDI settings, etc. until you've identified the problem.
Programming Midi Controls
The locations for the controls we'll be programming will be different for every DAW but in FL Studio, it's essentially a grouping of unidentified knobs and sliders with a blank drop down above it, all located in the channel settings. This area allows you to create groups of controls and then set the specific parameters of each control within (right clicking the knob brings up the available options). Whatever your setup gives you, you will need a total of 12 controls for the two pulse channels and less for the remaining channels. Access the settings/options for the first knob (for me, it's under "configure") and you should see the following among the options: Name, Controller # (be sure that, if given options between control types, 'CC' is selected), and a set of values determining the min and max possible value. Your program may have these organized in some fashion by CC# specifically but the same correlation of values will apply regardless.
Below are the settings I've chosen for all control knobs on this channel:
- Duty Cycle, CC#1, 0>127
- Mod Period, CC#6, 0>127
- Master Volume, CC#7, 0>127
- Fine Pitch, CC#8, 0>127
- Length Envelope, CC#9, 0>127
- Loop Envelope, CC#10, 0>127
- Volume Envelope, CC#11, 0>127
- Mod Hack, CC#12, 0>127
- Enable Sweep, CC#13, 0>127
(the following apply to the sweep functions)
- Sweep Up/Down, CC#14, 0>127
- Sweep Period, CC#15, 0>127
- Sweep Shift, CC#16, 0>127
Truth be told, I only use a few of these controls regularly, but having them all programmed in for possible future use is probably the best practice. Generally, I prefer to manually create some of the effects that can be done with certain parameters but on a regular basis I implement the Duty, Length, Loop and Volume controls in conjunction with general channel controls that are standard in most DAWs (like channel pitch, channel volume, note velocity, etc). But I'll save all that for later. We have four more channels to create!
Fortunately, everything about the Pulse 02 channel is the same as Pulse 01, with one exception - the Channel #. Remember, all channels will have the same port # but the channel needs to reflect one of five available channels on the NES. So naturally, Pulse 02 will be on channel '2'. Hopefully, your DAW has an option to duplicate the MIDI Out channel you just created (after which you can change the channel # and name) but if not, just do everything you just did again changing the name and channel # as mentioned above.
For the next three channels, we'll repeat this process but the channels will be designated 3-5 and the custom MIDI controls will be as follows:
TRIANGLE (channel 3):
- Fine Pitch, CC#8, 0>127
NOISE (channel 4):
- Master Volume, CC#7, 0>127
- Length Envelope, CC#9, 0>127
- Loop Envelope, CC#10, 0>127
- Volume Envelope, CC#11, 0>127
DPCM (channel 5):
- Pitch, CC#3, 0>127
- Loop, CC#4, 0>127
- Bank Switch, CC#14, 0>127
While I've included all of the Pulse channel controls previously, I've not done the same for the DPCM channel. This is one of those features that is 'expandable' in the sense that with additional hardware/software you can load different sample sets and do crazy stuff with it, but for the vast majority of compositions, I use this strictly as a drumkit (in conjunction with the noise channel) and so you can feel free to explore the others on your own to see what you can do once you've learned the basics and a bit more after that.
Well, that's it for this tutorial.
I hope this will be informative for some people just starting out as I know a lot of people here already know most of this but we'll get into the more advances stuff down the road!
Hey all, first time poster here, long time chip-tunes musician!
I released three albums awhile back (8-Bit Jesus, After These Messages & Shamroctoroc) and have been composing/arranging for fun in recent years, but decided to share some work I've done this past year, starting with a collection of Death Cab For Cutie covers I created using my NES and MidiNES.
https://soundcloud.com/doctoroctoroc/se … -for-katie
I started a few of the tracks back in 2011 but wasn't satisfied with the arrangements as my ability to manipulate the parameters were still pretty young. But after doing many, many compositions and arrangements since then, I've developed a few techniques that I think gave them a better sound.
I'd love to hear anyone's thoughts on the tracks.
I'm also finishing work on a full cover of Neutral Milk Hotel's "In The Aeroplane Over The Sea" album that should be popping up in the near future after I get some quality feedback from friends!
ChipMusic.org / Forums / Posts by Doctor Octoroc